To Get Your Google Analytics Code:
After you have your own Google Analytics account, login at http://www.google.com/analytics/- From the Analytics Settings page click on Add Website Profile, (select Add a Profile for another new domain).
- In the box, enter the URL of your blog or website that you want to track.
- Select your Country and Time zone, and then click Finish.
- Highlight the tracking code which displayed in the box and ‘Copy’.

How to Add Google Analytics Code to Your Blogger Blog:
- Sign into your Blogger, the dashboard loads.
- Click on ‘Layout’ and then click ‘Edit HTML’.
- An editing screen for your blog template’s HTML displays, scroll to the bottom until the end of the template and paste your Google Analytics tracking code just before the closing ‘body’ tag. It will looked like this:
(paste your Google Analytics tracking code HERE!)
</body>
</html> - Dont forget to click Save Changes. (done!)
<!-- Google Analytics code -->
To Ensure You Have Successfully Added Google Analytics Code to Your Blog:
- Go back to your Google Analytics account.
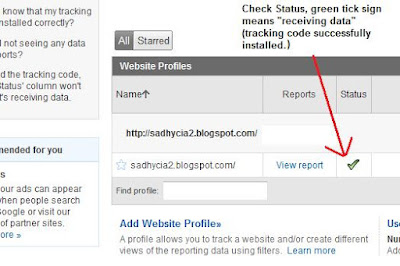
- At the main page, check your status which is under the Status column (next to your blog’s URL). If there is a green tick sign, it shows that it is “receiving data” (you were successful). If there is a yellow triangle and an exclamation mark, it means “Tracking not installed” (something is amiss).
- If it said “Tracking not installed” you can click on Check Status, Google then checks your blog for the Analytics Code and reports back if it find it or not.
- Once your Analytics tracking code has been verified, the green tick sign will appear and the status will change to ‘Receiving Data’. If not, try re-pasting the code.

Note: It takes about 24 hours or so after you install Gogle Analytics beforre you start seeing any data.
No comments:
Post a Comment