


Blackberry Screen Grabber is an application used to capture screen from your Blackberry phone. It is very useful, simple and easy to use – and it is also free! After you have captured the screen, you can then send your screen grabs to your Blackberry’s contacts.
Interested? If you are, then you can download the application through the following steps:
Showing posts with label Photo Online. Show all posts
Showing posts with label Photo Online. Show all posts
Wednesday, June 16, 2010

Saturday, May 1, 2010
What is IP Camera
An IP camera is a camera that uses the Web to transmit images and control signals. It transmits data in a digital format over an Ethernet connection. IP stands for Internet Protocol, and IP camera is also commonly called an IP network camera. It is usually used as a security camera and surveillance. The images quality are better than analog and it can be installed alone or in a group. They are normally mounted and connected to a digital video recorder (DVR) or linked to a network video recorder (NVR) to form a video surveillance system. If the IP camera is connected to a computer network, it can be viewed and managed over the internet from anyplace in the world. It simply needs access to a conventional Web browser and every IP camera on a network has its own unique network functions and address as a video server. The camera type have a wide variety of protocols including TCP/IP and HTTP.
Tuesday, December 1, 2009
Optimizing Youtube videos online
Many people doesn’t aware that Youtube is the second largest search engine and the 3th top site on the web. Therefore those of you who do business online should consider taking advantage of this huge opportunities which can be a great marketing tool for starting your own business. The website is completely free and you can upload as many videos as you like. Some simple things that can improve your Youtube rankings include:
Youtube Sharing Tips and Tricks
YouTube is one of the hottest sites on the Web. It lets users to upload and view all sorts of video clips online. Here is little tricks and tips to help you better view and share Youtube videos.

- To share Youtube video to your friends via email, you can click the “Share” link underneath the video player on that video’s page. The Share menu will appear, click “Email this video” and fill in the email addresses that you want to send in the “To” box, separating multiple addresses with commas. You can add some message too if you like (optional). You also can share your Youtube Favorites list, just press the Share button and then proceed the steps as usual.

- If you want to share a Youtube video to a friend, sometimes you want the video to jump to where the most important part and start from there without having to watch the unnecessary part from the beginning. All you have to do is adding this below code to the end of the URL.
#t=04m72s
m stands for minute and s stands for second.
- Or if it is an embed code, put &start=80 to the end of the embed url. The value number of the code represent seconds. So if &start=80 means it will skip the first 80 seconds of the video.
- There is a search box appears when you embed Youtube video to your site. In order to hide the search box, you can simply add &showsearch=0 to the embed url.
- After watching Youtube video, you need to press ‘play’ button again if you want to replay it. If you want the video to replay automatically you can add &loop=1 to the url part of the embed code.
- To make Youtube video play automatically when it is loaded in a browser, you can add &autoplay=1
How to create Playlist in Youtube
In Youtube, a playlist is a list of videos you add in an organized order. In other words, it is simply a collection of videos, it is used just like a folder - organized by whatever criteria you deem appropriate. You can create as many playlist as you want. Videos in the playlist can be played randomly or in order you want. Playlist is quite similar with quicklist except that a quicklist is temporary (not saved when the browser is closed). All playlists can be set for two levels of privacy: “Private”, where only you can view it and “Public”, available for all users to view.
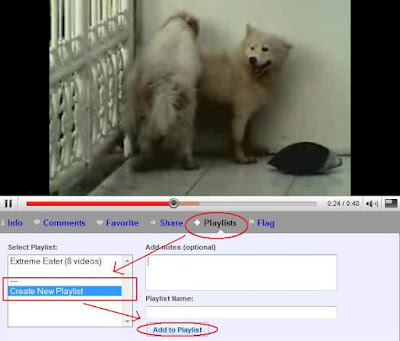

- First, you need to sign up to create Youtube account, otherwise you would not be able to create playlist in Youtube.
- When you are watching the video you want to add in the playlist, click the blue link “Playlist” below the vid.
- Inside the “Select Playlist” box, select Create New Playlist. Write the name of your playlist and you can add short notes about the playlist.

- Click “Add to Playlist” button and you will come to the page where you can enter additional information about the playlist such as Tags and Description, decide whether you want to make it private or public. Fill in the data you need to and save it.
- After you successfully creating a playlist, you can add some other videos into that playlist or creating another different playlist. The title of every playlist you created will appear in the “Select Playlist” box.
- To organize the order of your playlist you can click the dropdown menu on your username (top-right of the screen) and choose “Playlist”. Select which one of your playlist that you want to reorganize the order (at the left column of the screen). Then below of the page you will find list of videos from the playlist you select, click on the number next to the vid and change the order number.

How to make money with Youtube
Youtube, the most popular internet video networking community can be an excellent way to promote your website, affiliates, business or even making money with it. Since it can be used absolutely free, it is a great way to save on advertising costs.
The first thing you should do is of course register for Youtube account and follow the easy instruction provided. After that you can sign up for Google Adsense to earn extra income. Through Adsense, Youtube will pay your share from the revenues.
 To do that, you need to sign up first for the Youtube partnership, a revenue sharing program. Create your original videos and try not to copy others, pick your niche and decide what type of video you are going to upload (comedy, casual video logging, news, how-to, drama series, product reviews etc). Adding a watermark on your videos to direct users to your website is a great idea (of course you need to have a website). You are also allowed to insert link in the description box beside your videos to your site and you can put affiliate links and adsense on the site.
Once you have enough videos in your account, promote them by sending it to your friends, social networking sites and forums. You can leave video responses to other videos that match your interests. Find the latest videos posted by the most popular youtubers, make responses that are interesting or funny. If the youtuber likes it, he might favorite it and even mention you in one of his videos then it is a good news for you. Favourites help because they post to the youtubers channel, it’s just like free advertisement. Respond to any emails or messages you receive on Youtube to build a relationship with your viewers. Make more videos and upload them to Youtube, the more subscribers and views you get the better. Make sure the video file format is acceptable for Youtube.
The first thing you should do is of course register for Youtube account and follow the easy instruction provided. After that you can sign up for Google Adsense to earn extra income. Through Adsense, Youtube will pay your share from the revenues.
 To do that, you need to sign up first for the Youtube partnership, a revenue sharing program. Create your original videos and try not to copy others, pick your niche and decide what type of video you are going to upload (comedy, casual video logging, news, how-to, drama series, product reviews etc). Adding a watermark on your videos to direct users to your website is a great idea (of course you need to have a website). You are also allowed to insert link in the description box beside your videos to your site and you can put affiliate links and adsense on the site.
Once you have enough videos in your account, promote them by sending it to your friends, social networking sites and forums. You can leave video responses to other videos that match your interests. Find the latest videos posted by the most popular youtubers, make responses that are interesting or funny. If the youtuber likes it, he might favorite it and even mention you in one of his videos then it is a good news for you. Favourites help because they post to the youtubers channel, it’s just like free advertisement. Respond to any emails or messages you receive on Youtube to build a relationship with your viewers. Make more videos and upload them to Youtube, the more subscribers and views you get the better. Make sure the video file format is acceptable for Youtube.
Friday, October 30, 2009
How to add Favicon to Blogger blog
Favicon stands for “favourite icon”, (also known as a bookmark icon, shortcut icon or website icon). It is a 16 X 16 pixels icon which appears next to a website’s URL in the address bar, it also appears next to the page’s title in a tabbed document interface and in bookmarks. Adding a favicon to your own blog is a good way to distinguish your blog from millions of other blogs.
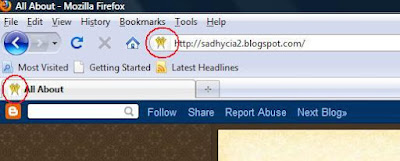
There are many free online tools which can help you generate a favicon. As for me, i use http://www.html-kit.com/favicon/ for my favicons. When you upload your favicon image to HTML kit’s they will automatically give you two 16 X 16 favicons to download, one is still image and the other one is animated version. You also can create your own image for your favicon from any image manipulation softwares like Gimp or Photoshop, just by selecting the dimension to be 16 X 16. I know there are still many sites that many people recommend to generate a favicon, but i dont have time yet to explore them.
To add favicon to your Blogger:

There are many free online tools which can help you generate a favicon. As for me, i use http://www.html-kit.com/favicon/ for my favicons. When you upload your favicon image to HTML kit’s they will automatically give you two 16 X 16 favicons to download, one is still image and the other one is animated version. You also can create your own image for your favicon from any image manipulation softwares like Gimp or Photoshop, just by selecting the dimension to be 16 X 16. I know there are still many sites that many people recommend to generate a favicon, but i dont have time yet to explore them.
To add favicon to your Blogger:
- You can upload your favicon image to an external web host, such as Photobucket or your Google Picasa album. Login to your Picasa photo album and Click upload button to upload your image. Once your image is sent, copy the URL by clicking “Link to this photo” on the right side of the screen. To copy your image URL, you also can do it by right-click on the image and select “Copy Image Location”.
- Login to your Blogger, from the dasboard click Layout and then Edit Html.
- Perform your back-up.
- Find the following code:
</head>
- Just above the code (or in between <head> and </head> tags), add the following HTML code:
<link rel="shortcut icon" href="Your-Favicon-Image-URL" >
or
<link href='Your-Favicon-Image-Url' rel='shortcut icon' type='image/vnd.microsoft.icon'/>
Replace the red text above with your favicon image URL. Once you're done, the code should finally appear like this (i take mine for an example):
<link href='https://blogger.googleusercontent.com/img/b/R29vZ2xl/AVvXsEhAK7V9Xnb759Kcso_g_BRPRljqrEBkIqzf3rBY2tGc5QxXihzecnkc4zOx77F9b4iHLb_hRyrBe4f51yuAXAroL7pIuq0NvoZBPQgzRho4L8kz_OO_fWTMXVS37g4J3t36FPRlkS5yvI9n/' rel='shortcut icon' type='image/vnd.microsoft.icon'/>
</head>
- Save your template and test.
Wednesday, October 14, 2009
How to modify or change image border in Blogger
In previous post you probably have read my post about how to remove image border from your Blogger posts, in addition here i want to show you how to modify, change, add styles or effects to the border of your images as well.
There are number of methods to change the color of the image border in Blogger. Here is one of them:
To change the border line style around your image from solid line to dotted line you can simply change the word like this:
To change the border line style around your image from solid line to dashed line you can simply change the word like this:

The word control the type of your image border, and other types of line style that you can use as a border are "groove", "inset", "outset", "double", "ridge" and "hidden". Try replace with those words and see how it looks like.
What is padding? Padding is a space between your border and your image. To increase or decrease the space between your border and image you can change the pixel number from this following line:
To add a background to your image as border:
To add a background effect you must have your padding on, after you add your padding then you can add this following line to your code:
Replace the Image Location text to your image URL. Your code should then look like this:
.post img {
border: 6px solid #FF0080;
padding: 12px;
background: url(Http://www.pichost.com/myimage.gif);
}

There are number of methods to change the color of the image border in Blogger. Here is one of them:
- From your Blogger dashboard, go to Layout – Edit HTML (no need to check the Expand Widgets Template box).
- Find the following code, you can use Ctrl + F to find them via your browser finder:
.post img {
padding:4px;
border:1px solid $bordercolor;
}
or
img{
padding: 4px;
border:1px solid $bordercolor;
}
- The code above is the tag for your images style. After you found it, change the following line:border:1px solid $bordercolor;toborder:1px solid #FF00FF;
- Replace the red color text above with your own color HTML code. For example if you want it to be dark red: border:1px solid #B40404; or if you want it to be light green: border:1px solid #A9F5A9.
- After you’re done click Save Template button to save your changes.
To change the border line style around your image from solid line to dotted line you can simply change the word like this:
border:1px dotted $bordercolor;
To change the border line style around your image from solid line to dashed line you can simply change the word like this:
border:1px dashed $bordercolor;
Dashed style.
The word control the type of your image border, and other types of line style that you can use as a border are "groove", "inset", "outset", "double", "ridge" and "hidden". Try replace with those words and see how it looks like.
 border 8px Double, padding 2px | |
 border 8px Inset |  border 8px Outset border 8px Outset |
 border 8px Ridge, padding 2px |  border 8px Dotted |

What is padding? Padding is a space between your border and your image. To increase or decrease the space between your border and image you can change the pixel number from this following line:
padding: 5px;
To add a background to your image as border:
To add a background effect you must have your padding on, after you add your padding then you can add this following line to your code:
background: url(Image Location);
Replace the Image Location text to your image URL. Your code should then look like this:
.post img {
border: 6px solid #FF0080;
padding: 12px;
background: url(Http://www.pichost.com/myimage.gif);
}

Tuesday, October 13, 2009
How to remove image border in Blogger
In certain Blogger templates such as Minima template, there is an image border given automatically everytime you upload your photos or images to your blog. Sometimes you need to remove it or change it all the image borders around all your images that appear in your posts.
Here are the example of image with border and without border:
How to remove image border in Blogger, here are the steps:
To increase the width of your image border, just simply change the pixel number from 1px to 2px or 3px etc.
How to remove the border of an image of a single post and leaving the rest alone with their borders?
In this case then you can edit your post which contains the image that you want to remove its border, go to "Edit Html" mode and insert this following code inside the image source tag of the image:
so the code should then appear like this:
Here are the example of image with border and without border:
 | |
How to remove image border in Blogger, here are the steps:
- Log in to your Blogger account.
- On the dashboard, navigate to Layout – Edit HTML.
- Download your existing Blogger template for your back up by clicking “Download Full Template” button.
- Find the below code in your template (no need to tick the Expand Widgets Templates box). Note: the code in Blogger blog templates varies but the code below is the code we will find on a Blogger Minima template or most other default Blogger templates.
.post img {
padding:4px;
border:1px solid $bordercolor;
}
or if you could not find those code, find these code below:
img{
padding: 4px;
border:1px solid $bordercolor;
}
- When you have found it, you have two ways to delete or remove the unwanted border image code. You can either delete the following line:border:1px solid $bordercolor;
or change the border pixel to zero, like this:border:0px
- After that dont forget to click "Save Template" button and start to admire your new post images without the image border.
To increase the width of your image border, just simply change the pixel number from 1px to 2px or 3px etc.
How to remove the border of an image of a single post and leaving the rest alone with their borders?
In this case then you can edit your post which contains the image that you want to remove its border, go to "Edit Html" mode and insert this following code inside the image source tag of the image:
style="border:none;"
so the code should then appear like this:
<img src="image location" style="border:none;" />
Thursday, September 24, 2009
Show profile image beside comments
In this post, i want to discuss on how to display profile image beside comments we post in our blog or people’s blog. Of course to do that we have to upload our profile picture to Blogger beforehand and that profile photo we uploaded will be used to display next to our comment. Here’s how:
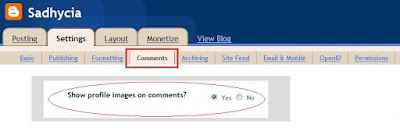 This feature is actually enabled automatically in all Blogger blogs, its only that if you have not upload your own picture or image, Blogger will display a default image which is the Blogger’s logo or icon next to your comments.
- After sign in to your Blogger, go to Settings and click on Comments tab.
- Scroll down below and find “Show profile image on comments” and set it to “Yes”.
- To disable profile image function in your blog’s comments, just simply set it again to “No”.
 This feature is actually enabled automatically in all Blogger blogs, its only that if you have not upload your own picture or image, Blogger will display a default image which is the Blogger’s logo or icon next to your comments.

Add Blogger & Youtube profile photo
Here are two simple steps on how to add your photo to Blogger and Youtube profile.
To add profile picture or photo to Blogger:
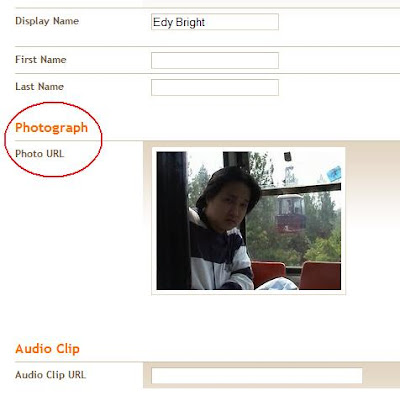
To add profile picture or photo to Youtube:
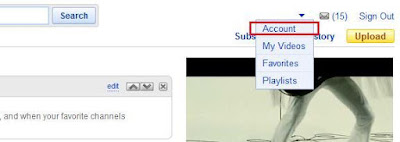
To add profile picture or photo to Blogger:
- Sign in to your Blogger with your ID and password.
- Click Edit Profile next to your profile icon on top left.
- Scroll down until you find Photograph section.

- Click to mark at the radio button and browse to where your picture is located to be uploaded to Blogger profile.
- If you are finish uploading, scroll down to bottom of the page and click “Save Profile”.
- You are done.
To add profile picture or photo to Youtube:
- Sign in to your Youtube account with your ID and password.
- Click “Account” from a drop down menu at the top right of the page.

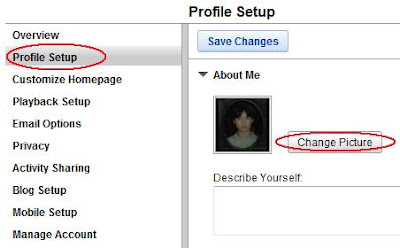
- Click “Profile Setup” on the left of the screen.

- Click “Change Picture” button and browse to find your picture in the computer to be displayed as your thumbnail profile icon.
- Click “Save Changes” to save your update made to you Youtube channel.
- You’re done.
Wednesday, September 23, 2009
How to use name tags (Facial Recognition)
Seems Google’s Picasa Web Albums has successfully made people amazed by their new technology. Picasa now has built-in face-matching technology (face-recognition feature) which could identify people’s faces by comparing facial features in photographs so we can easily add name tags to the people in our photos.
Picasa Web Albums now can scan our photos of what it believes are faces, allow us to identify a person we know in the photographs, and scan the rest of our pics for the same person allowing us to quickly tag them too and organize our photos. It automatically groups pictures containing similar faces so we can label a number of pictures at once.
Lets get started, here’s how to begin:
 If you found something not related you can always uncheck it, skip or mark selected faces as Ignore or Not a Face. You can link their tags to their email address if it is in your contact list. If you have tagged all of the photos, try to put your mouse cursor over any photo, their name will appear to show you who they are.

Picasa Web Albums now can scan our photos of what it believes are faces, allow us to identify a person we know in the photographs, and scan the rest of our pics for the same person allowing us to quickly tag them too and organize our photos. It automatically groups pictures containing similar faces so we can label a number of pictures at once.
Lets get started, here’s how to begin:
- First sign in to Picasa Web Albums.
- Click Settings in the upper-right corner.
- Click Privacy and Permissions.
- Check the first box labeled “Use name tags to name people in my photos” and then click Save changes (done).
 If you found something not related you can always uncheck it, skip or mark selected faces as Ignore or Not a Face. You can link their tags to their email address if it is in your contact list. If you have tagged all of the photos, try to put your mouse cursor over any photo, their name will appear to show you who they are.
Tuesday, September 22, 2009
How to use tags to label photos in Picasa Web Albums
Picasa Web Albums lets you tag your photos. By putting tags to label your photos in Picasa Web Albums, you can easily locate specific photos when searching. It is just the same as when you label your post in your blog or label your email in Gmail. You will find the option in the sidebar.
 You can search your photos, your friends’ public photos and certain gallery. Google indexes tags, captions, album tiltles, album locations and album descriptions. To search for a photo with a tag, simply type the tag inside the search box provided in the upper-right corner of the page. Your search result will appear in the ‘My Photos’ section.
- Sign in to your Picasa Web Albums using your Gmail username and password.
- Select which photo you want to tag.
- Click the tags button on the right side of the page.
- Fill in the name of the tag inside the text box, enter a space separated list of tags, for example: “Wedding Flower” “Birthday Flower” Flower.
- When you’re done simply click Add and done.
 You can search your photos, your friends’ public photos and certain gallery. Google indexes tags, captions, album tiltles, album locations and album descriptions. To search for a photo with a tag, simply type the tag inside the search box provided in the upper-right corner of the page. Your search result will appear in the ‘My Photos’ section.
Monday, September 21, 2009
How to use Google's Picasa Web Album
Many Bloggers do not know that images they uploaded are automatically stored to Picasa. Google’s Picasa program allows us to put our photos online and easily sharing them over the web. Each account gets 1GB of free storage (enough to share or post around 4000 standard resolution photos).

Learn how to use Google’s Picasa Web Album:

Learn how to use Google’s Picasa Web Album:
- Sign in using your ID after created a Gmail account.
- Upload your photos using the software’s “Web Album” button, you can also use your normal web browser to add images. You will be asked to make a new album for categorizing your images. If you choose to designate your photo album as unlisted, that means your online photo album can be viewed only for those who receive your invitations.
- You can start sharing your photos with anyone, select which album of yours that you want to share. Instead of attaching your photos one-by-one to send in an email, you actually can create and send a link to a photo, an album or even your entire online gallery and you can do it without leaving the Picasa Web Albums site.
- If your friend shares an album with you, you can download his/her album into your Picasa rather than simply viewing another’s photographs.
- You also can give your photo and your friend’s photo comments and add captions. If captions already given to your photos in Picasa, the same captions remain after you upload them to the web. Captions and comments added on Blogger or Picasa Web Albums will only be visible on that site.
Sunday, September 20, 2009
Howto make posted image unclickable
If you upload an image or picture to your blog especially Blogspot, the image uploaded will be clickable which means that visitors will be able to click the picture to enlarge it or find out the image url. Many people do not know that their picture can be hacked in order to be unclickable, this is a useful hack for people who want their image not to be clickable for certain reasons.
Saturday, August 1, 2009
How to Add Images to Yahoo Email
To add an image as an attachment in Yahoo mail probably most of you know how to do it, just click the ‘Attach Files’ button on the Compose Mail page, browse to where you put the image and it will automatically being uploaded. How about if including the picture directly in your message, so that readers will easily view the pictures and the message at the same place without having to bother downloading the images.
In order to do it, first you have to locate your images at any web server. You can upload it to free image hosting service like Picasa web album, Photobucket, ImageShack etc or to your own web host. After that you can insert the pictures from the web in an email, make sure the Yahoo mail rich text editor is enabled.

In order to do it, first you have to locate your images at any web server. You can upload it to free image hosting service like Picasa web album, Photobucket, ImageShack etc or to your own web host. After that you can insert the pictures from the web in an email, make sure the Yahoo mail rich text editor is enabled.
- Open your image in a browser, the one you upload to web server.
- Highlight the image using your mouse and press Ctrl + C (copy). If you right click the image and select "copy image" it doesn't work in Firefox, maybe it works for Internet Explorer. So better to highlight using your mouse and press Ctrl + C.
- Go to your Yahoo mail, put your cursor inside the email body where you want the picture to show up and then press Ctrl + V (paste). Yahoo has inserted the picture inside the email, you can continue typing your email after or before the image.
- You can also simply use ‘drag and drop’ to do this as an alternative way.

Wednesday, July 8, 2009
Tips & Tricks optimize StumbleUpon
In using StumbleUpon, there are rules to follow in order to get positive result and give your site a traffic boost. Here are some useful and popular tips that are used by many good Stumblers to optimize their websites:
- Set up your StumbleUpon profile is important.
- Don’t lead stumblers to main page of your website or blog.
- Create a good quality content and try to only stumble the best content of your website.
- Your content should be written in a way that cannot be digested just in one single visit.
- Don’t put so many advertising and selling products, it may looked cramped.
- Your website should have memorable branding and an easy to remember URL.
- Label and tag your submitted pages appropriately. Broad tagging helps. Find some popular and often searched keywords.
- Like Digg , Propeller, Reddit, Mixx and any related social bookmarking websites, making friends as many as you can and expanding your networking is one of the most important factor.
- Attach StumbleUpon button on your website to allow visitors stumble your web page easily.
- Stumble a page which link to you and encourage other user to do the same.
- You can buy sponsored stumbles, it means that you pay StumbleUpon for every targeted person they bring to your page. You can target according to personal interest, location, history of rating similar sites and demographics such as sex and age.
- Personalize your ‘About’ page and join the communities relating to your interests.
Basic guide how to use StumbleUpon
Different ways to stumble, follow this guide and enjoy the quick and easy way to explore StumbleUpon.
To stumble according to your one specific interest:
From the toolbar > All > select an interest.
To stumble other user’s favorites:
From their profile > click Stumble (you will stumbling to sites which are thumbed-up by that user).
To stumble within user’s tag:
From their profile > click one of their favorite tags > Stumble (you will be stumbling to sites that come within their tag).
To stumble pages only from certain website (e.g Youtube, Blogger), this is also called StumbleThru or Channel Stumbling:
From the toolbar > All > Stumble Thru.
From the website > Stumble Thru (on footer below).
Stumble pages based on keywords:
From the toolbar > search/ tag box > enter keyword > enter and Stumble.
To show the “search/ tag box”:
Go to Tools > Toolbar option > Search & Tagging tab > check the ‘Show search/ tag’ box.
To go back to basic stumbling:
Click on ‘Tools’ a drop-down menu of your toolbar > All, or
From the website > Discover tab > Stumble.
To change the type of sites you would like to visit:
Click ‘Settings’ on top right > Manage Interests > select the subjects which interest you > Save preference.
You will occasionally stumble upon a “sponsored stumble”. It means that an advertiser has paid to bring their site to you. This is indicated by a green-shirted person icon in the toolbar. You will only see sponsored web pages related to the topics you are interested in and you will not see more than one sponsored web page per fifteen stumbles.
You can also find out whether your website is already listed on StumbleUpon, to do that you can visit this link and type in your URL.
How to set up your StumbleUpon profile:
Click ‘Settings’ > Account Settings:
Fill in your name, email address, location and etc. You can choose whether or not you want to display your birthday to public.
Click ‘Settings’ > Customize Profile:
You can change your theme color, write a short description of yourself and select as many things you’d like other users to know about you.
Click ‘Setting’ > Profile Picture:
Upload your profile picture. A logo for your site or a close-up of you are perhaps the best choices.
Sharing your StumbleUpon with friends via email:
You can import your friend’s email contacts to find out which of them is already using StumbleUpon so you can add/ subscribe to them or invite your friends to join for those who haven’t.
Click the Stumblers tab > click on ‘See who you know’ > Find friends > enter your email address and password > Find friends.
Mark the checkbox next to the name of your friend/s who already use StumbleUpon to make them your StumbleUpon friendd.
Mark the checkbox next to the name of your friend/s who do not use StumbleUpon to invite them to use it.
Click Invite.
To stumble according to your one specific interest:
From the toolbar > All > select an interest.
To stumble other user’s favorites:
From their profile > click Stumble (you will stumbling to sites which are thumbed-up by that user).
To stumble within user’s tag:
From their profile > click one of their favorite tags > Stumble (you will be stumbling to sites that come within their tag).
To stumble pages only from certain website (e.g Youtube, Blogger), this is also called StumbleThru or Channel Stumbling:
From the toolbar > All > Stumble Thru.
From the website > Stumble Thru (on footer below).
Stumble pages based on keywords:
From the toolbar > search/ tag box > enter keyword > enter and Stumble.
To show the “search/ tag box”:
Go to Tools > Toolbar option > Search & Tagging tab > check the ‘Show search/ tag’ box.
To go back to basic stumbling:
Click on ‘Tools’ a drop-down menu of your toolbar > All, or
From the website > Discover tab > Stumble.
To change the type of sites you would like to visit:
Click ‘Settings’ on top right > Manage Interests > select the subjects which interest you > Save preference.
You will occasionally stumble upon a “sponsored stumble”. It means that an advertiser has paid to bring their site to you. This is indicated by a green-shirted person icon in the toolbar. You will only see sponsored web pages related to the topics you are interested in and you will not see more than one sponsored web page per fifteen stumbles.
You can also find out whether your website is already listed on StumbleUpon, to do that you can visit this link and type in your URL.
How to set up your StumbleUpon profile:
Click ‘Settings’ > Account Settings:
Fill in your name, email address, location and etc. You can choose whether or not you want to display your birthday to public.
Click ‘Settings’ > Customize Profile:
You can change your theme color, write a short description of yourself and select as many things you’d like other users to know about you.
Click ‘Setting’ > Profile Picture:
Upload your profile picture. A logo for your site or a close-up of you are perhaps the best choices.
Sharing your StumbleUpon with friends via email:
You can import your friend’s email contacts to find out which of them is already using StumbleUpon so you can add/ subscribe to them or invite your friends to join for those who haven’t.
Click the Stumblers tab > click on ‘See who you know’ > Find friends > enter your email address and password > Find friends.
Mark the checkbox next to the name of your friend/s who already use StumbleUpon to make them your StumbleUpon friendd.
Mark the checkbox next to the name of your friend/s who do not use StumbleUpon to invite them to use it.
Click Invite.
Submit articles to StumbleUpon How To
How to add a web page to StumbleUpon:
When you are giving ‘thumbs up’ for an article, if the web page is already in StumbleUpon, the image will highlight andd nothing else will happen. You still can add a review of the page by clicking the ‘text balloon’ button in the toolbar. If the web page is not already on StumbleUpon, a pop-up window will open asking you for a title and description of the content as well as a classification of wwhat type of article it is. Adding details about the site would be useful for any stumblers and also for your StumbleUpon profile. You need to fill in the title, the review, topic category, tags and other necessary details. You can also find out whether your website is already listed on StumbleUpon, to do that you can visit this link and type in your URL.
 If you find a site which you think is good or interesting, don’t hesitate to make the owner of the site happy by clicking the ‘i like it’ button. If you are the first person who Stumble the article, you ‘discover’ it, it means your profile will show up on the reviews page for that article, and of course it can drive traffic back to you. When you Stumble other people’s posts and they see an increase in traffic, they will curiously want to know where that traffic came from, so it will leads them back to you.
Therefore it is also important to have a well established profile on StumbleUpon before you start Stumbling further. Add your URL, you can change the Layout and colors, put more information about yourself and etc.
StumbleUpon is a good technique for building lots of backlinks to your website. To generate traffic with StumbleUpon.com really depends on the quality of your content. Try only to stumble the best content on your site. Don’t stick to a site which is intended to sell things, people would be more likely to click the “dislike” button and that would further decrease the popularity of your site.
When you are giving ‘thumbs up’ for an article, if the web page is already in StumbleUpon, the image will highlight andd nothing else will happen. You still can add a review of the page by clicking the ‘text balloon’ button in the toolbar. If the web page is not already on StumbleUpon, a pop-up window will open asking you for a title and description of the content as well as a classification of wwhat type of article it is. Adding details about the site would be useful for any stumblers and also for your StumbleUpon profile. You need to fill in the title, the review, topic category, tags and other necessary details. You can also find out whether your website is already listed on StumbleUpon, to do that you can visit this link and type in your URL.
 If you find a site which you think is good or interesting, don’t hesitate to make the owner of the site happy by clicking the ‘i like it’ button. If you are the first person who Stumble the article, you ‘discover’ it, it means your profile will show up on the reviews page for that article, and of course it can drive traffic back to you. When you Stumble other people’s posts and they see an increase in traffic, they will curiously want to know where that traffic came from, so it will leads them back to you.
Therefore it is also important to have a well established profile on StumbleUpon before you start Stumbling further. Add your URL, you can change the Layout and colors, put more information about yourself and etc.
StumbleUpon is a good technique for building lots of backlinks to your website. To generate traffic with StumbleUpon.com really depends on the quality of your content. Try only to stumble the best content on your site. Don’t stick to a site which is intended to sell things, people would be more likely to click the “dislike” button and that would further decrease the popularity of your site.
Create link on StumbleUpon profile
Your StumbleUpon profile can be a great place if you want to promote your website. When the StumbleUpon users reach your profile page and want to know more about you the chances of these visitors checking out your site are so much greater if you have a clickable link to bring them to your site. It’s very simple to create link from your StumbleUpon profile to your site, here’s how:

- Go to your StumbleUpon account and click “Settings” on top-right corner of the screen.
- Go to the second tab and click “Customize Profile”.
- In the “About you” section, the first line there you will be asked to “introduce yourself to everyone”. You can start making your link inside the empty box provided with your profile details. You can create the clickable link to your site by inserting the usual html code, which is:
<a href="http://www.sadhycia.blogspot.com/">your text here</a>
Change my URL (the blue text) with yours and change the red text above with whatever you like. The text is going to be your link to direct visitors to the URL you put.

- Don’t be surprised that StumbleUpon system will automatically add a “No Follow” code to the coding.
- Click “Save preferences”. Take a look at your profile and there will be a clickable link there which you’ve just created.
Subscribe to:
Posts (Atom)