I assume that you have a ready picture which you would like to place in your Blogger header. Edit you picture, touch up and resize using photo editing softwares. Save your picture in your computer or upload it onto an image server. Remember to make sure that the size of your image will align well with the rest of the header section. Turning on and off the Title and Description texts can also mess up your alignment.
You can browse to other blogs or websites and see which of your favorite header size and measure it. To measure the size of the header you can use free software such as Measureelt Addons if you use Firefox browser (download Firefox for free here). If Measureelt has been successfully installed, all you have to do is to draw out a ruler to get the pixel width and height of any elements on a webpage (it's very easy).
Ok, let's get started;
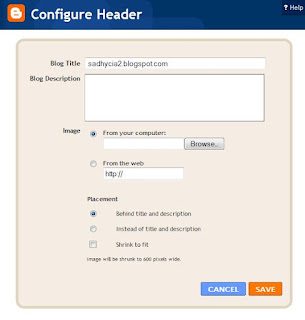
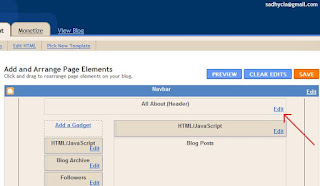
First sign in to your Blogger account, then click Layout and it will take you to Add and Arrange Page Elements. From there, click the Edit button for your header. The screen below will pop up.
 Click browse and go to where you put your image and it will be uploaded immediately from your computer. After being uploaded remember to fill in your Title and Description in the text box above, your picture will appear as a backgroundd to the Title and Description (turning the text off can be done later), after that save your changes.
To turn off or hide the blog Title and Description text simply click the header edit button again. Configure Header box will pop up again but with a slightly different option.
 Choose the 'Placement: Instead of title and description'. This option will hide your Title and Description from appearing on the blog (but still kept as your blog's information). With this option, the image is clickable and will automatically link to your main blog index page. To show up your Title and Description text, simply click the other option.
If you select "Behind title and description", your picture will appear as a background, whatever you type as your title and description will bbe visible on the face of the image. With this option, only the title links to your main index page but the image does not.
Click here to find out how to remove borders in header.
You also can place your image in the header through HTML;
Go to Layout > Edit HTML and scroll down your template until you come across the "header wrapper". It looks like this;
#header-wrapper {
width:750px;
margin:0 auto;
background: url(URL OF YOUR PICTURE) bottom right no-repeat;
height: 200px;
}
No comments:
Post a Comment