


 HubPages is a social networking and personal interaction website, you can promote your website through HubPages. It is just another way for webmasters to create their quality backlink. By using Hubpages, users can write anything they are knowledgeable about or anything they like and add links to direct relevant traffic to their main site. You can use Hubpages to promote your affiliate products or even your Internet home based business website, and another best part is that you do not have to learn or have any knowledge about HTML, PHP, CSS or any other tech stuff, it is basedd on WYSIWYG (What You See Is What You Get). The writing platform is sleek and user friendly. You also don't have to be an expert in order to write about a subject.
Showing posts with label Domain and Hosting. Show all posts
Showing posts with label Domain and Hosting. Show all posts
Sunday, April 11, 2010
What is and How to use Hubpages
HubPages is a social networking and personal interaction website, you can promote your website through HubPages. It is just another way for webmasters to create their quality backlink. By using Hubpages, users can write anything they are knowledgeable about or anything they like and add links to direct relevant traffic to their main site. You can use Hubpages to promote your affiliate products or even your Internet home based business website, and another best part is that you do not have to learn or have any knowledge about HTML, PHP, CSS or any other tech stuff, it is basedd on WYSIWYG (What You See Is What You Get). The writing platform is sleek and user friendly. You also don't have to be an expert in order to write about a subject.

Saturday, November 7, 2009
How to redirect using meta refresh tag
Meta refresh redirect is a way to redirect pages, it sends your visitors from a page to another page using a meta http-equiv tag that you inserted into the header of an html document.
Here’s how to use it:
www.yourdomainname.com/nameofyourfolder and it will automatically redirect the page.
The main disadvantage of this method is that you need a separate file for every redirect.
Note that this method will not cloak your affiliate url in the address box. This basically just do a simple redirection.
By using meta refresh method to redirect, the tag is actually telling the browser to automatically request another page of a site after a certain number of seconds. The content=”” command tells your browser how many second to wait before executing the refresh and the redirection. Becareful of using this method because many SEO experts said that search engines may not like this and they may lower your page rank or even ban you because you are sending visitors to a page other than the one they requested.
Here’s how to use it:
- First, create a folder and name it whatever you like. The name of the folder will be used as part of the url link that you are going to use to redirect. So if your folder’s name is “mysite” then the redirect link will be “www.yoururl.com/mysite”
- Create an html file (you can use a notepad), and place the following script and save it as index.html. Replace “your URL” with the URL which you want to redirect and store the file in the folder which you just created.


- Upload the folder to your hosting account and you are done.
www.yourdomainname.com/nameofyourfolder and it will automatically redirect the page.
The main disadvantage of this method is that you need a separate file for every redirect.
Note that this method will not cloak your affiliate url in the address box. This basically just do a simple redirection.
By using meta refresh method to redirect, the tag is actually telling the browser to automatically request another page of a site after a certain number of seconds. The content=”” command tells your browser how many second to wait before executing the refresh and the redirection. Becareful of using this method because many SEO experts said that search engines may not like this and they may lower your page rank or even ban you because you are sending visitors to a page other than the one they requested.
How to do a PHP redirect
PHP redirect is a way to redirect pages, it sends your visitors from a page to another page using a PHP script. This kind of redirect is said to be more search engine friendly than using Meta Refresh redirect. There’s several reason webmasters need to redirect pages includes making their long url shorter or because the changes they made to their site’s directories. You can easily redirect your readers to a different page using a small snippet of PHP code (or also known as php redirect). Using this method, your visitors can be transfered to the new page witthout having to click a link to continue. Fortunately redirecting pages using PHP is an easy task.
Here’s how to do it:

Here’s how to do it:
- Create and name your new folder. Your folder’s name will be used as part of the url link which you are going to use for redirecting. Let’s say the name of your folder is “mypage” then the redirect link will be www.yoururl.com/mypage
- Create a php file (you can use a notepad), copy paste the following php code below into the notepad and remember to save it as index.php. Replace “your URL” with the URL where you want the redirection to take place and store the file in the folder that you just created.

- Upload the folder to your hosting account and it’s done. Test the new file in all major browsers, like this: www.domainname.com/nameofyourfolder. The redirect should be instantaneous.
How to use PHP include
If you have a website with plenty of pages to update, to edit each page and change it one by one will be very tedious and boring things to do. The more page you have, the more possibility that you make mistakes. Using PHP include is certainly something you need and it is very helpful because not only it enables you to uniform certain parts of your content pages, but also update them all by only editing a single file.
Before you start using PHP includes, make sure that your web host or server can handle PHP files. Secondly, when you are using PHP includes on any pages, make sure the extension of those page is “.php” instead of “.html”. By using this PHP include script, once uploaded to the web, all of your files will merge appropriately to form one page.
Here’s how the PHP code looks like:
The code can be pasted into sidebars, header, tables and anywhere you like.
Change the "filename" to anything you like, to make things easier to remember, it is suggested that you give it a name which correlates to the content you will be putting in it. For example if it is “header.php” then the file should be made especially for header. If the file contains advertisements for your site, then you can name it “ads.php”.
Next, you will want to create a page where the content of this page will appear in the page that contains the PHP include code. Make sure you save it with the exact same name you assigned to the code above, otherwise the script wont work.
Sometimes the path names doesn’t work and therefore you need to use alternative way, that is using the URL in the include instead, like this:
Using this method is less efficient in terms of server resources because (just like a browser) it has to create an HTTP session, get the file and then pull it in (even both of them located at the same server). This method of course is slower than using a pathname.
You can include files with .html, .php, .txt, .asp and other extensions.
Before you start using PHP includes, make sure that your web host or server can handle PHP files. Secondly, when you are using PHP includes on any pages, make sure the extension of those page is “.php” instead of “.html”. By using this PHP include script, once uploaded to the web, all of your files will merge appropriately to form one page.
Here’s how the PHP code looks like:
<?php include("filename.php"); ?>
The code can be pasted into sidebars, header, tables and anywhere you like.
Change the "filename" to anything you like, to make things easier to remember, it is suggested that you give it a name which correlates to the content you will be putting in it. For example if it is “header.php” then the file should be made especially for header. If the file contains advertisements for your site, then you can name it “ads.php”.
Next, you will want to create a page where the content of this page will appear in the page that contains the PHP include code. Make sure you save it with the exact same name you assigned to the code above, otherwise the script wont work.
Sometimes the path names doesn’t work and therefore you need to use alternative way, that is using the URL in the include instead, like this:
<?php include("http://www.domainname.com/directory/filename.php"); ?>
Using this method is less efficient in terms of server resources because (just like a browser) it has to create an HTTP session, get the file and then pull it in (even both of them located at the same server). This method of course is slower than using a pathname.
You can include files with .html, .php, .txt, .asp and other extensions.
Thursday, November 5, 2009
What is Reseller Hosting
Many web hosting firms offer reseller hosting service. With this type of hosting, the account owners of reseller service rent out portion of their disk space and bandwidth they receive to other end users. In this case, the account owners are just like a hosting service provider to those end users.
Difference Between Shared Hosting, VPS and Dedicated Hosting
There are basically 3 types of hosting available – shared hosting, VPS hosting and dedicated hosting. Of course there are differences between these three and knowing which type of service is best for your website is very important.
Wednesday, November 4, 2009
Set up CO.CC domain on 000webhost account
What is CO.CC? If you've never heard of CO.CC, the following sentence I took directly from the source may explain it to you briefly.
CO.CC will provide us with a domain name free of charge (yourdomainname.co.cc). Since the domain name is free and it’s easy to make, this can be absolutely useful for those who want to make a website and are not ready yet to pay for a domain name. Installing the domain on your web host takes about 5 minutes. I found many people use the CO.CC domain name to replace their Blogspot URL for their custom domain (for example, you will see myblog.co.cc instead of myblog.blogspot.com), you can do it to your Wordpress too or any other blog that support the feature.
If you are interested to get the free domain, start registering, which is easy and fast (each account can only have 2 free domain ending with co.cc). Here are the steps:


Important: Always backup your files after you do an update when you host your site on 000webhost as many users account are closed without any warning or notifications. I had an account in 000webhost and it has suddenly been closed "due to Inactivity" without informing me beforehand. The 000webhost affiliate program is also reported by many people as a scam, you can find this on Google.
“CO.CC is the world's best free domain name registrar and the leading provider of Internet services including - Free dns service, online marketing, url forwarding, e-mail and more.”
CO.CC will provide us with a domain name free of charge (yourdomainname.co.cc). Since the domain name is free and it’s easy to make, this can be absolutely useful for those who want to make a website and are not ready yet to pay for a domain name. Installing the domain on your web host takes about 5 minutes. I found many people use the CO.CC domain name to replace their Blogspot URL for their custom domain (for example, you will see myblog.co.cc instead of myblog.blogspot.com), you can do it to your Wordpress too or any other blog that support the feature.
If you are interested to get the free domain, start registering, which is easy and fast (each account can only have 2 free domain ending with co.cc). Here are the steps:
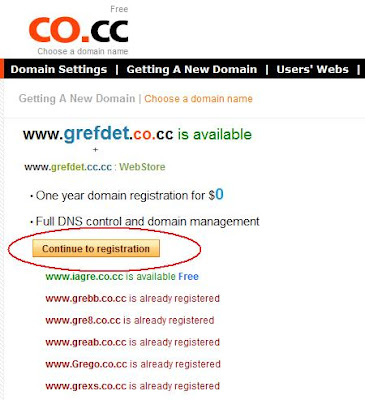
- Click Here to go to CO.CC (will open in a new tab), fill in your domain name of choice in the box provided and press “check”. A page will come up telling you whether that domain name is available. If not, select a new domain name to try. Sometimes it will charge you $3 or $7 for a good domain name you choose, dont be dissapointed, you can ‘slightly’ change your domain name or add extra letter, or number, or insert a hyphen somewhere in it until it’s totally free.
- If your domain name is available, then you can start to press “Continue to registration”.

- A “Create an account” page will come up somewhere around this step (if i’m not wrong) and if it does, fill up all your details needed.
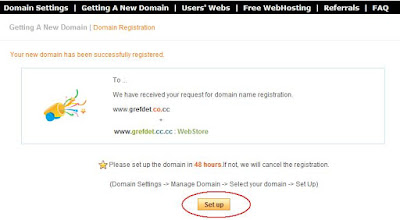
- After that you will reach to a page where it states “Your new domain has been successfully registered”.

- Click “Set up” and you will get 3 option: Name Server, Zone Record, and URL Forwarding.

- Select “Name Server” and you are given a form where you can enterr a couple of name servers. Let's take 000webhost for our tutorial (since it is also free), the 000webhost DNS server addresses are normally ns01.000webhost.com and ns02.000webhost.com (ok, if you want to convince yourself that we will not entering the wrong name server, lets skip this and move on to the next step).
- Open a new tab and go to your 000webhost account (i assume that you’ve already got your free 000webhost account). From the main page, click “Create New” at the top and fill in your new CO.CC domain and your password in the box provided. After you’re done then click “Setup New Account”
 On the new page click "Back to Account List".
- After that on the Account List page, you will see the nameservers on top. Those nameservers are the one you have to enter into the Manage DNS box column in the previous step which you had skip.


- Go back to the previous tab where you are on the CO.CC Manage DNS form page. Enter those nameservers and when you finish entering the nameservers, click “Set up” button and the job is done.


Important: Always backup your files after you do an update when you host your site on 000webhost as many users account are closed without any warning or notifications. I had an account in 000webhost and it has suddenly been closed "due to Inactivity" without informing me beforehand. The 000webhost affiliate program is also reported by many people as a scam, you can find this on Google.
Tuesday, November 3, 2009
How to Create Domain Email at Your Hosting Cpanel
Creating our own email address at our own domain is very easy. Most paid website hosting servers have an opstion for creating your email address with your own domain name. This domain email is included with your cost and setting it up is not only free but it can also add a professional touch to your business. This is why many popular websites choose to have their own domain emails under their contact page. You can create a number of different email addresses on your web server but this number varies from one service provider to another.
Friday, October 30, 2009
How to change Blogger URL address
Simple steps on how to rename your Blog’s URL:
 Important:
There are many disadvantages of changing your blog URL especially if you have a well-established blog and has been on the Web for a long time. If you changed your blogger’s URL, any existing incoming links will become dead, therefore you will lose your loyal visitors who frequently visit your blog, except they are informed beforehand. These dead links include those bookmark links that you received from your social bookmarking websites and the links from Favorites and Bookmarks of your visitor's browser. Secondly, you can say bye- bye to your Alexa ranking and your Google pagerank which solely depends on your blog’s URL. You will have to wait for your new URL to be indexed by the search engines all over again.
So before changing your blog URL think it carefully, do it if it is absolutely necessary for you.
- Sign in to your blogger.
- On your dashboard, click on “Settings”
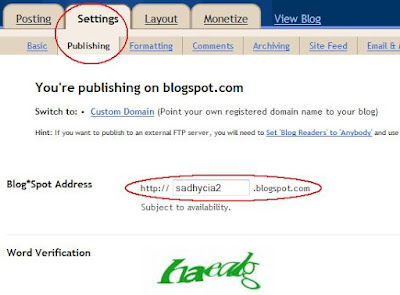
- On your Basic Settings page, switch to “Publishing” tab
- On Publishing Setings page, you have 2 options to change the URL of your blog. The first one is to enter a purchased domain name which will omit the “blogspot” in your URL. The second option is to type in the input box provided with your new URL ending still with “blogspot.com”. You will need to checkfor availability just as you did when you first created your URL. If the new address is available, your blog will be republished on the spot, under that address.
- Complete the word verification and save your settings.
 Important:
There are many disadvantages of changing your blog URL especially if you have a well-established blog and has been on the Web for a long time. If you changed your blogger’s URL, any existing incoming links will become dead, therefore you will lose your loyal visitors who frequently visit your blog, except they are informed beforehand. These dead links include those bookmark links that you received from your social bookmarking websites and the links from Favorites and Bookmarks of your visitor's browser. Secondly, you can say bye- bye to your Alexa ranking and your Google pagerank which solely depends on your blog’s URL. You will have to wait for your new URL to be indexed by the search engines all over again.
So before changing your blog URL think it carefully, do it if it is absolutely necessary for you.
Sunday, July 12, 2009
Google Webmaster Tools Basic Guide
Bloggers, online marketers and website owners have always need more information with regards to how search engines see their sites. Google Webmaster Tools provide free service and support for those looking to improve a site’s visibility, diagnose errors and declare preferences on how to handle web site listings. You can also have the data forwarded to your email address.
Monday, July 6, 2009
How to Check If a Website is Legit
The web is full of threats these day (it can be anything from common email spam to malicious software spread by infected websites). Im sure that many of you do not know how to check whether a website or domain is blacklisted or not, this is very important especially for those who want to buy a registered domain name, provide advertisement space or have a links exchange. It is very useful also for those who just moved to a new server or a new hosting company and want to check whether his or her IP address is clean or not.
One of the great tools i can find in the internet to help this is BlaclistAlert.org, you can use it to make sure that your website is not listed on any of those blacklists. You only need to insert your domain in the text field and the tool will check on mmore than 30 spam and malware blacklists. If the status is OK, then there should be no problems but if it is not OK, there should be an explanation there. Another site you can use is using mxtoolbox. If your site is happen to be listed, then you can find out on how to remove yourself from the list. To check whether a website is banned by Google/Adsense you can use bannedcheck.
To check whether a website is down for everyone or just you, you can simply use this helpful tool downforeveryoneorjustme.com. Sometimes people cant access their own site and think that their website is down for a moment but in fact, they might be having DNS or ISP problems.
To check for the page rank, keyword density, link popularity, backlinks, meta tags, social services (and many more) of a website you can try testeverything. This tools are divided into 8 categories and you can try anything from ping testers to graphic generators.
A decent website should have a contact page with contact numbers and company address. You can also check that information using a whois search and find out whether they are matched. Many fraudulent websites claim that their company resides in US but when checked with the tools it has different story.
Other important factors to consider is the age of a website, a scam site is normally has a several month old (although not all of them are). Usually the domain names are registered several years in advance if the websites plan to stay long in the business.
Check their hosting neighbours using IP search. Many of the fraudulent websites are in a shared IP address. You need to be careful when the neighbours sounds fishy or looks spammy.
Use your common sense and avoid any offers that seem too good to be true. Many of the trusted websites have Veri-Sign logo at the bottom of the page. Click the link to make sure whether the site is legitimate or not before continuing to use the site.
One of the great tools i can find in the internet to help this is BlaclistAlert.org, you can use it to make sure that your website is not listed on any of those blacklists. You only need to insert your domain in the text field and the tool will check on mmore than 30 spam and malware blacklists. If the status is OK, then there should be no problems but if it is not OK, there should be an explanation there. Another site you can use is using mxtoolbox. If your site is happen to be listed, then you can find out on how to remove yourself from the list. To check whether a website is banned by Google/Adsense you can use bannedcheck.
To check whether a website is down for everyone or just you, you can simply use this helpful tool downforeveryoneorjustme.com. Sometimes people cant access their own site and think that their website is down for a moment but in fact, they might be having DNS or ISP problems.
To check for the page rank, keyword density, link popularity, backlinks, meta tags, social services (and many more) of a website you can try testeverything. This tools are divided into 8 categories and you can try anything from ping testers to graphic generators.
A decent website should have a contact page with contact numbers and company address. You can also check that information using a whois search and find out whether they are matched. Many fraudulent websites claim that their company resides in US but when checked with the tools it has different story.
Other important factors to consider is the age of a website, a scam site is normally has a several month old (although not all of them are). Usually the domain names are registered several years in advance if the websites plan to stay long in the business.
Check their hosting neighbours using IP search. Many of the fraudulent websites are in a shared IP address. You need to be careful when the neighbours sounds fishy or looks spammy.
Use your common sense and avoid any offers that seem too good to be true. Many of the trusted websites have Veri-Sign logo at the bottom of the page. Click the link to make sure whether the site is legitimate or not before continuing to use the site.
Subscribe to:
Posts (Atom)