


Showing posts with label Google Products. Show all posts
Showing posts with label Google Products. Show all posts
Saturday, March 5, 2011
Google Panda Algorithm Update 2011

Thursday, March 11, 2010
Tips to optimize AdSense for Search
AdSense for search can be a great way to increase website revenue for the owner. You can place 2 AdSense search boxes on a page. When visitors search some query using the search box on your pages and click on the ads which appear on the top and right side of the results page, you get paid. To implement Adsense for search you can simply copy and paste the code given into any place on your website and let the search engine collect the dollars for you :)
As many webmasters suggest that you should change the color of the search box to match the background of your site and text so that your AdSense search box should look like it belongs to the page, well..in fact a colorful and recognizable search box will stand out on your site and it works too, many bloggers have different result with both of them.
You also have the option given by AdSense whether you’d like the search results to be opened within your own website or to be host by Google. Many publisher choose to open within their own sites so that readers will believe that the source of search resullt is from your blog and this makes them love to click ads. The other reason is that the site owner have more control over the design. It’s not a bad idea also to put your search box on the results page itself for any users who might want to make another searches.
Publishers also can insert keywords to refine the results to make them more relevant to your readers. Let’s say you have a website about Photoshop, you can enter the keywords “Adobe”, “Computer Softwares” and “Photos”.
Your AdSense search box should be placed where your visitors can find it with a quick glance. Locations such as below the header and right or left navigation column are good spots for this. Place it above the fold, it means that the visitors should not have to scroll down in order to notice the search box. You can also place it below each post for easy navigation.
Another important thing should be considered is adding your logo, this is a cool feature because it provides chance for your readers to see and remember your logo that might increase their chances of remembering your website for a future visit.
As many webmasters suggest that you should change the color of the search box to match the background of your site and text so that your AdSense search box should look like it belongs to the page, well..in fact a colorful and recognizable search box will stand out on your site and it works too, many bloggers have different result with both of them.
You also have the option given by AdSense whether you’d like the search results to be opened within your own website or to be host by Google. Many publisher choose to open within their own sites so that readers will believe that the source of search resullt is from your blog and this makes them love to click ads. The other reason is that the site owner have more control over the design. It’s not a bad idea also to put your search box on the results page itself for any users who might want to make another searches.
Publishers also can insert keywords to refine the results to make them more relevant to your readers. Let’s say you have a website about Photoshop, you can enter the keywords “Adobe”, “Computer Softwares” and “Photos”.
Your AdSense search box should be placed where your visitors can find it with a quick glance. Locations such as below the header and right or left navigation column are good spots for this. Place it above the fold, it means that the visitors should not have to scroll down in order to notice the search box. You can also place it below each post for easy navigation.
Another important thing should be considered is adding your logo, this is a cool feature because it provides chance for your readers to see and remember your logo that might increase their chances of remembering your website for a future visit.
Page Impressions, Page CTR and eCPM
What is Page Impressions in AdSense report?
Page Impressions: how many times your AdSense JavaScript is executed by a user’s browser and ads are displayed. They will count one page impression regardless with the number of ads shown on that page, so if you put 3 ads unit on a page and it is viewed twice, you will receive 2 ‘page impressions’ and 6 ad unit impressions.
Page views: how many times the page or pages containing your AdSense advertisement was shown to readers or visitors.
What might causes page impressions and page views becomes different:
When your pages are viewed in mobile devices and the like, sometimes all other elements might not be working and the request will simply be ignored to include external data. Your ads also will not be shown up if the users have disabled or turned off the JavaScript or you open the page in a browser which does not support JavaScript and <iframe> tag. Your AdSense also will not show up if the readers are running ad blocking software so what they see is a blank space instead of your ads. The visits made by Googlebot and other spiders that are indexing your content will also increase your pageviews and it doesn’t include your ads.
Clicks: how many times your AdSense link is being clicked.
What is Page CTR?
Page CTR: CTR (Click Through Rate), is the number of times an advertisement is clicked divided by tthe number of impressions for the page containing the ads. In other words, it is the percentage of the clicks received, based on how many views it has. CTR = number of clicks / number of exposures.
What is eCPM?
Page eCPM: eCPM stands for ‘effective cost-per-thousand, (M= mil, it’s Latin )’ it is calculated by dividing the total earnings by total number of impressions in thousands. (Total earnings / Impressions) X 1000 = eCPM.
Page Impressions: how many times your AdSense JavaScript is executed by a user’s browser and ads are displayed. They will count one page impression regardless with the number of ads shown on that page, so if you put 3 ads unit on a page and it is viewed twice, you will receive 2 ‘page impressions’ and 6 ad unit impressions.
Page views: how many times the page or pages containing your AdSense advertisement was shown to readers or visitors.
What might causes page impressions and page views becomes different:
When your pages are viewed in mobile devices and the like, sometimes all other elements might not be working and the request will simply be ignored to include external data. Your ads also will not be shown up if the users have disabled or turned off the JavaScript or you open the page in a browser which does not support JavaScript and <iframe> tag. Your AdSense also will not show up if the readers are running ad blocking software so what they see is a blank space instead of your ads. The visits made by Googlebot and other spiders that are indexing your content will also increase your pageviews and it doesn’t include your ads.
Clicks: how many times your AdSense link is being clicked.
What is Page CTR?
Page CTR: CTR (Click Through Rate), is the number of times an advertisement is clicked divided by tthe number of impressions for the page containing the ads. In other words, it is the percentage of the clicks received, based on how many views it has. CTR = number of clicks / number of exposures.
What is eCPM?
Page eCPM: eCPM stands for ‘effective cost-per-thousand, (M= mil, it’s Latin )’ it is calculated by dividing the total earnings by total number of impressions in thousands. (Total earnings / Impressions) X 1000 = eCPM.
How If AdSense PIN Code Never Come
In order to check your address as a publisher, Google Adsense will send Personal Identification Number (PIN) via mail to your address. This is a part of AdSense payment system. The PIN will be sent if the publisher has crossed $10 mark. Normally, it takes about 3 to 4 (sometimes 6) weeks for the PIN to arrive at your place. The PIN itself will looked like a postcard with the PIN code enclosed. You need to enter the PIN code on your Adsense account so that you are able to receive payment.
Tuesday, December 1, 2009
Optimizing Youtube videos online
Many people doesn’t aware that Youtube is the second largest search engine and the 3th top site on the web. Therefore those of you who do business online should consider taking advantage of this huge opportunities which can be a great marketing tool for starting your own business. The website is completely free and you can upload as many videos as you like. Some simple things that can improve your Youtube rankings include:
Youtube Sharing Tips and Tricks
YouTube is one of the hottest sites on the Web. It lets users to upload and view all sorts of video clips online. Here is little tricks and tips to help you better view and share Youtube videos.

- To share Youtube video to your friends via email, you can click the “Share” link underneath the video player on that video’s page. The Share menu will appear, click “Email this video” and fill in the email addresses that you want to send in the “To” box, separating multiple addresses with commas. You can add some message too if you like (optional). You also can share your Youtube Favorites list, just press the Share button and then proceed the steps as usual.

- If you want to share a Youtube video to a friend, sometimes you want the video to jump to where the most important part and start from there without having to watch the unnecessary part from the beginning. All you have to do is adding this below code to the end of the URL.
#t=04m72s
m stands for minute and s stands for second.
- Or if it is an embed code, put &start=80 to the end of the embed url. The value number of the code represent seconds. So if &start=80 means it will skip the first 80 seconds of the video.
- There is a search box appears when you embed Youtube video to your site. In order to hide the search box, you can simply add &showsearch=0 to the embed url.
- After watching Youtube video, you need to press ‘play’ button again if you want to replay it. If you want the video to replay automatically you can add &loop=1 to the url part of the embed code.
- To make Youtube video play automatically when it is loaded in a browser, you can add &autoplay=1
How to create Playlist in Youtube
In Youtube, a playlist is a list of videos you add in an organized order. In other words, it is simply a collection of videos, it is used just like a folder - organized by whatever criteria you deem appropriate. You can create as many playlist as you want. Videos in the playlist can be played randomly or in order you want. Playlist is quite similar with quicklist except that a quicklist is temporary (not saved when the browser is closed). All playlists can be set for two levels of privacy: “Private”, where only you can view it and “Public”, available for all users to view.
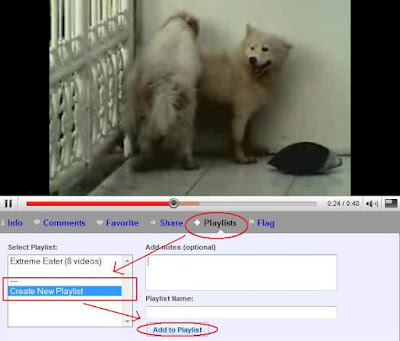

- First, you need to sign up to create Youtube account, otherwise you would not be able to create playlist in Youtube.
- When you are watching the video you want to add in the playlist, click the blue link “Playlist” below the vid.
- Inside the “Select Playlist” box, select Create New Playlist. Write the name of your playlist and you can add short notes about the playlist.

- Click “Add to Playlist” button and you will come to the page where you can enter additional information about the playlist such as Tags and Description, decide whether you want to make it private or public. Fill in the data you need to and save it.
- After you successfully creating a playlist, you can add some other videos into that playlist or creating another different playlist. The title of every playlist you created will appear in the “Select Playlist” box.
- To organize the order of your playlist you can click the dropdown menu on your username (top-right of the screen) and choose “Playlist”. Select which one of your playlist that you want to reorganize the order (at the left column of the screen). Then below of the page you will find list of videos from the playlist you select, click on the number next to the vid and change the order number.

How to make money with Youtube
Youtube, the most popular internet video networking community can be an excellent way to promote your website, affiliates, business or even making money with it. Since it can be used absolutely free, it is a great way to save on advertising costs.
The first thing you should do is of course register for Youtube account and follow the easy instruction provided. After that you can sign up for Google Adsense to earn extra income. Through Adsense, Youtube will pay your share from the revenues.
 To do that, you need to sign up first for the Youtube partnership, a revenue sharing program. Create your original videos and try not to copy others, pick your niche and decide what type of video you are going to upload (comedy, casual video logging, news, how-to, drama series, product reviews etc). Adding a watermark on your videos to direct users to your website is a great idea (of course you need to have a website). You are also allowed to insert link in the description box beside your videos to your site and you can put affiliate links and adsense on the site.
Once you have enough videos in your account, promote them by sending it to your friends, social networking sites and forums. You can leave video responses to other videos that match your interests. Find the latest videos posted by the most popular youtubers, make responses that are interesting or funny. If the youtuber likes it, he might favorite it and even mention you in one of his videos then it is a good news for you. Favourites help because they post to the youtubers channel, it’s just like free advertisement. Respond to any emails or messages you receive on Youtube to build a relationship with your viewers. Make more videos and upload them to Youtube, the more subscribers and views you get the better. Make sure the video file format is acceptable for Youtube.
The first thing you should do is of course register for Youtube account and follow the easy instruction provided. After that you can sign up for Google Adsense to earn extra income. Through Adsense, Youtube will pay your share from the revenues.
 To do that, you need to sign up first for the Youtube partnership, a revenue sharing program. Create your original videos and try not to copy others, pick your niche and decide what type of video you are going to upload (comedy, casual video logging, news, how-to, drama series, product reviews etc). Adding a watermark on your videos to direct users to your website is a great idea (of course you need to have a website). You are also allowed to insert link in the description box beside your videos to your site and you can put affiliate links and adsense on the site.
Once you have enough videos in your account, promote them by sending it to your friends, social networking sites and forums. You can leave video responses to other videos that match your interests. Find the latest videos posted by the most popular youtubers, make responses that are interesting or funny. If the youtuber likes it, he might favorite it and even mention you in one of his videos then it is a good news for you. Favourites help because they post to the youtubers channel, it’s just like free advertisement. Respond to any emails or messages you receive on Youtube to build a relationship with your viewers. Make more videos and upload them to Youtube, the more subscribers and views you get the better. Make sure the video file format is acceptable for Youtube.
Friday, October 30, 2009
How to Stop or Turn Off Commenting Feature on Blogger
In Blogger, by default, comments enabled for all our posts. Have you ever wanted to turn off or disable commenting on your specific post on your Blogger post? In fact, you are allowed to do so, here’s how:
How to remove date, time and author on Blogger posts
There are many reason for blogger to hide their post date, post time and post author. It might appear less cluttered to them or simply they want to make their blog looks cleaner and tidier. Now Blogger provides an easy and fast way for you to hide those options without having to edit your HTML template and involve in HTML codes. You can choose to hide only post time, post date, or post author, or all of them, and even to hide some other options like label, comments, Show Quick Editing and etc . Ok lets we begin the tutorial:

You can also check the date of an article or web page and find out when it was first published.
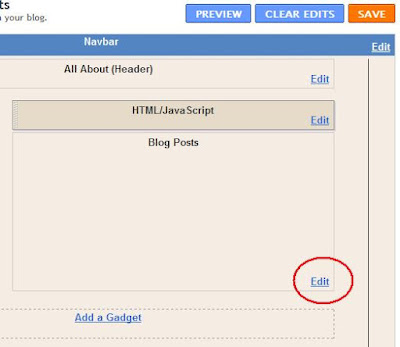
- First thing to do is of course sign to your blogger account and go to your Layout from your dashboard, then at the bottom of the Blog Posts box, click an edit button and a pop up box will appear.

- Now all you have to do is uncheck the radio button next to each Post Page options to hide the menu and check it again to re-show it on your blog.

- When you’re finished with your settings, click save and the task is done.
You can also check the date of an article or web page and find out when it was first published.
Remove Newer or Older Post Links
If you want to make your Blogger blog looks like a website, one of the things you need to remove is the “Newer Post”, "Home", and “Older Post” links from Blogspot post footer. Besides removing them you actually can change them or add images instead of “Newer Post” and “Older Post” links. There are two ways to do it and these hack are easy to perform and will take only few seconds.
 How do i get rid of "Older Posts" - "Home" - "Newer Post" links?
 How do i get rid of "Older Posts" - "Home" - "Newer Post" links?
- From your Blogger dashboard click on Layout > Edit HTML > tick Expand Full Templates box.
- Don’t forget to backup your template, many bloggers made mistakes in this hack.
- Search for the following code:
<data:newerPageTitle/>
and
<data:olderPageTitle/>
- Now simply delete above codes or replace with anything you want to write, to add picture just place the image URL before the Previous Page and Next Page. Remember to preview changes before saving it.
- Go to Layout > Edit HTML > tick Expand Full Templates box.
- Again, backup your template.
- Find these codes below:
#blog-pager-newer-link {
float: $startSide;
}
#blog-pager-older-link {
float: $endSide;
}
#blog-pager {
text-align: center;
}
- Add "display: none;" inside every curly braces, it will then looks like this:
#blog-pager-newer-link {
float: $startSide;
display: none;
}
#blog-pager-older-link {
float: $endSide;
display: none;
}
#blog-pager {
text-align: center;
display: none;
}
- Preview the changes and click save template.
How to change Blogger URL address
Simple steps on how to rename your Blog’s URL:
 Important:
There are many disadvantages of changing your blog URL especially if you have a well-established blog and has been on the Web for a long time. If you changed your blogger’s URL, any existing incoming links will become dead, therefore you will lose your loyal visitors who frequently visit your blog, except they are informed beforehand. These dead links include those bookmark links that you received from your social bookmarking websites and the links from Favorites and Bookmarks of your visitor's browser. Secondly, you can say bye- bye to your Alexa ranking and your Google pagerank which solely depends on your blog’s URL. You will have to wait for your new URL to be indexed by the search engines all over again.
So before changing your blog URL think it carefully, do it if it is absolutely necessary for you.
- Sign in to your blogger.
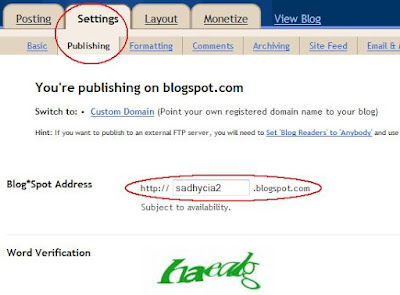
- On your dashboard, click on “Settings”
- On your Basic Settings page, switch to “Publishing” tab
- On Publishing Setings page, you have 2 options to change the URL of your blog. The first one is to enter a purchased domain name which will omit the “blogspot” in your URL. The second option is to type in the input box provided with your new URL ending still with “blogspot.com”. You will need to checkfor availability just as you did when you first created your URL. If the new address is available, your blog will be republished on the spot, under that address.
- Complete the word verification and save your settings.
 Important:
There are many disadvantages of changing your blog URL especially if you have a well-established blog and has been on the Web for a long time. If you changed your blogger’s URL, any existing incoming links will become dead, therefore you will lose your loyal visitors who frequently visit your blog, except they are informed beforehand. These dead links include those bookmark links that you received from your social bookmarking websites and the links from Favorites and Bookmarks of your visitor's browser. Secondly, you can say bye- bye to your Alexa ranking and your Google pagerank which solely depends on your blog’s URL. You will have to wait for your new URL to be indexed by the search engines all over again.
So before changing your blog URL think it carefully, do it if it is absolutely necessary for you.
Thursday, October 29, 2009
How to remove navigation bar in Blogger blog
You will see a navigation bar of every blogger blog, the colored stripe across the top that consists of Blogger search box used to search your posts, a link to your dashbord, a place to sign in, make a new post, and customize your blog option. Sometimes, the color of the Navbar does not fit for your Blogger design or template and Blogger does not provide any option for us to remove it. As many Blogger do not like to have it and choose to remove this bar in order to make their blog look more professional and does not look like the rest, and you need not try to match your blog’s colours to the limited colour palet which the Navbars come in. Secondly when your readers click on “Next Blog” on the navbar, they will be redirect to some other blog on the same window and your blog will disappear from the view.
 How to remove navigation bar from your Blogger blog (actually it is just hidden), it’s easy to implement. Here are the steps:
 How to remove navigation bar from your Blogger blog (actually it is just hidden), it’s easy to implement. Here are the steps:
- Sign to your Blogger, from the dashboard click Layout > Edit HTML.
- As usual, it is always recomended that you back up the template before changing anything. To perform the back up, just click “Download Full Template” and save it to your computer.
- Now look for the following code:
/* Variable definitions
- Immediately above that line, insert this following code:
#navbar-iframe {
display:none;
}
- Click “Save Template” orange button to save the changes.
- Done :)
Monday, October 12, 2009
How to back up your Blogger blog
Perhaps one of the most important thing about Blogger is to know how to back up your entire blog especially when you have put so many effort and had so many posts in it. There can be nothing worse than to find your blogger blog gone one day, either being hacked, corrupted, deleted or any other unforseen error. In the past backing up our posts, comments, pictures or images and links was almost impossible and requires some kind of third party software. Blogger changed a lot and always come up with new features, this time i want to write about their ‘backup’ function. Now we can create a complete backup of our Blogger blog on to the hard drive easily and fast, just in a clicks. At least now you dont have to worry if you accidentally delete some of your old blog post.


This export import features can also be used to export all of your Blogger blog to other blogging platform like Live Journal, Wordpress, etc.., or to import your blogs from Wordpress, etc.., into your Blogger blog.
- To start backing up your Blogger blog, first sign in to your account.
- From your dashboard click setting.
- On the basic tab click Export blog.

- A new page will load, click “Download Blog” and the download manager will appear, save your XML file to your hard disc.

- Done.

This export import features can also be used to export all of your Blogger blog to other blogging platform like Live Journal, Wordpress, etc.., or to import your blogs from Wordpress, etc.., into your Blogger blog.
Thursday, October 8, 2009
How to add adsense after the posts
Many people believe that having adsense ads just before the blog posts and after the blog posts will best optimize their performance. How to show adsense adds at the end of Blogger posts, as you probably all had known about how to put adsense adds in the beginning of the posts below the title (as for those who dont know you can read my previous post on how to put adsense in the beginning of the posts, under the heading). To put adsense adds at the end of the posts is as easy as putting it under the heading, its only that you need to place the adsense code slightly at different position. Lets get started before you get confused..
- First you need to parse your adsense code. You will not contravene adsense terms and conditions by parsing the code (parse means to substitute the < and > for the HTML encoding for these characters). You can go to http://blogcrowds.com/resources/parse_html.php to parse your code, its easier and faster so that you need not to change it manually.
- Log in to your Blogger dashboard then click Layout > Edit HTML.
- Tick “Expand Widget Templates” box. Make sure that you backup your template before making any changes.
- Find below code (its easier using your browser built-in search feature):<data:post.body/>To feature ads at the end of each posts, paste your parsed adsense code below the above code. To feature ads after your post titles, insert your parsed Google adsense code just before the above code in your template.
- Dont forget to save the template and start to see the ads in action.
Wednesday, October 7, 2009
How to add AdSense Adds in the middle of Blogger posts
Is it possible to add Google adsense ads in the middle of your posts? Yes it is possible and not only that, you also can choose where you want to put your adsense ad in your blog post. Besides it looked more professional, many blogger use this hack in the hope of getting more clicks on their adsense so that they earn more money.
Ok lets get started..
Ok lets get started..
- First step, of course you need to login inside your Blogger account using your username and password.
- Then, on your dashboard, click Layout > Edit HTML and tick Expand Widget Templates above the template HTML box.
- Press Ctrl + F to find this code:<data:post.body/>
and replace the above code with all the codes below:
<div expr:id='"aim1" + data:post.id'></div>
<div style="clear:both; margin:10px 0">
PLACE YOUR ADSENSE CODE HERE
</div>
<div expr:id='"aim2" + data:post.id'>
<data:post.body/>
</div>
<script type="text/javascript">
var obj0=document.getElementById("aim1<data:post.id/>");
var obj1=document.getElementById("aim2<data:post.id/>");
var s=obj1.innerHTML;
var r=s.search(/\x3C!-- adsense --\x3E/igm);
if(r>0) {obj0.innerHTML=s.substr(0,r);obj1.innerHTML=s.substr(r+16);}
</script>
Before you insert your Google adsense ads code, you need to parse it first. Click here to find out what is meant by parsing the code. To parse your adsense code you can simply go to http://blogcrowds.com/resources/parse_html.php
Note: if you have the “Read More” hack installed on your blog, you will find two similar code of <data:post.body/> then you change or replace the first one.
- After that save your template and its done!
- You now can write your post as usual and when you want to place your adsense ads somewhere in the post, just insert this tag <!-- adsense --> and your adsense ads will automatically appear on that spot.
How to put your adsense below the title
Many say that put advertisements under the headings, visitors will be more inclined to click your ads. In the page element setting on Blogger there is no option that we can put adsense under the title and above the posts. Here are the alternative steps you can try to do it (these steps are for Layout template or new Blogger template).
Note that the adsense code cannot be pasted directly in the blogger’s XML template because error message will appear like this:
Your template could not be parsed as it is not well-formed. Please make sure all XML elements are closed properly. XML error message: The processing instruction target matching "[xX][mM][lL]" is not allowed.
So before you put your adsense code in your blog, you need to parse the code. What is meant by parse the code? Parse means making your adsense code standarded XML and that is made by replacing aall the HTML character such as (<) with (<), (>) with (>) and (") with ("). Parsing your adsense code will not violet any Blogger or Adsense regulations and parsing the code is necessary in order to put the code in Blogger's XML template. You can replace them one by one manually or by using text editor to replace all the HTML. There is a Parse HTML tool used for parsing your adsense code and is free and easy, that is:
Paste the adsense code and click “Parse”. Now copy the parse result and save it. When you’re done follow the steps below:
(Example), If you want it on the left:
When you are done click “Save Template” and do check your blog to make sure your adsense ads are right where you want it.

Note that the adsense code cannot be pasted directly in the blogger’s XML template because error message will appear like this:
Your template could not be parsed as it is not well-formed. Please make sure all XML elements are closed properly. XML error message: The processing instruction target matching "[xX][mM][lL]" is not allowed.
So before you put your adsense code in your blog, you need to parse the code. What is meant by parse the code? Parse means making your adsense code standarded XML and that is made by replacing aall the HTML character such as (<) with (<), (>) with (>) and (") with ("). Parsing your adsense code will not violet any Blogger or Adsense regulations and parsing the code is necessary in order to put the code in Blogger's XML template. You can replace them one by one manually or by using text editor to replace all the HTML. There is a Parse HTML tool used for parsing your adsense code and is free and easy, that is:
http://blogcrowds.com/resources/parse_html.php
Paste the adsense code and click “Parse”. Now copy the parse result and save it. When you’re done follow the steps below:
- Login to your Blogger.
- Click Layout.
- Click Edit HTML (it is always a good idea to backup your templlate, so that you can revert if you mess things up).
- Check mark “Expand Widget Templates” above the template HTML box.
- Now If you want to put your adsense above posts and below the page title, then paste your parsed adsense code above this tag:
<div style='float: alignment (right or left)?;'> Your adsense code here </div>
<div style='float:left;'>
AdSense Code
</div>
AdSense Code
</div>
When you are done click “Save Template” and do check your blog to make sure your adsense ads are right where you want it.

Tuesday, October 6, 2009
How to prevent accidental clicks on your own AdSense Ads
Not a few of the bloggers who accidentally click on their own Google adsense ads. This accidental click often happens when they are updating, changing or modifying their blog, in part because of their negligence too and errors of the computer or Blogger itself. Because of this they can get themselves being banned from that Google adsense program. One of the things probably you should do when you caught yourself accidentally clicking on your own Google adsense ads is to contact Google straight away, email them before they email you, provide more information such as the date and time when this happen.
One of the good way that i can find to prevent yourself from this accidental click is perhaps using this free script who was developed by Michael Hampton.
One of the good way that i can find to prevent yourself from this accidental click is perhaps using this free script who was developed by Michael Hampton.
- To implement it, you need the latest Firefox installed in your computer.
- After that download and install GreaseMonkey add on to your browser to apply the script (old versions of GreaseMonkey are not tested and not supported).
- For the script itself you can get it by clicking Here. After installing the script, the first time you see your adsense ad unit, it will pop up with a box to ask for your adsense publisher ID which can be found in your adsense account, look out for your Google adsense code and find this code PUB-XXXXXXX. This is needed to let the script knows which ads to prevent clicks from.
- To find out whether you’d successfully install the script is to test by clicking on the “Ads by Google” link in your ad units, if it does not go anywhere then it is working.
Thursday, September 24, 2009
Show profile image beside comments
In this post, i want to discuss on how to display profile image beside comments we post in our blog or people’s blog. Of course to do that we have to upload our profile picture to Blogger beforehand and that profile photo we uploaded will be used to display next to our comment. Here’s how:
 This feature is actually enabled automatically in all Blogger blogs, its only that if you have not upload your own picture or image, Blogger will display a default image which is the Blogger’s logo or icon next to your comments.
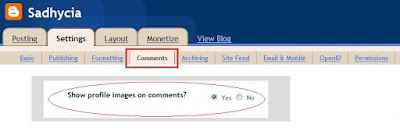
- After sign in to your Blogger, go to Settings and click on Comments tab.
- Scroll down below and find “Show profile image on comments” and set it to “Yes”.
- To disable profile image function in your blog’s comments, just simply set it again to “No”.
 This feature is actually enabled automatically in all Blogger blogs, its only that if you have not upload your own picture or image, Blogger will display a default image which is the Blogger’s logo or icon next to your comments.

Add Blogger & Youtube profile photo
Here are two simple steps on how to add your photo to Blogger and Youtube profile.
To add profile picture or photo to Blogger:
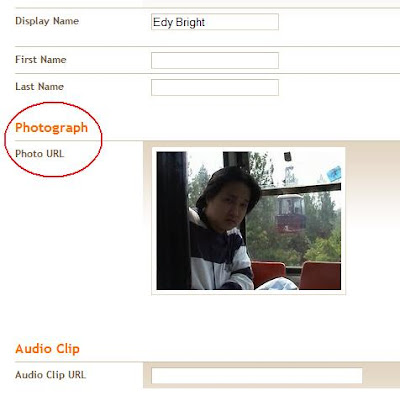
To add profile picture or photo to Youtube:
To add profile picture or photo to Blogger:
- Sign in to your Blogger with your ID and password.
- Click Edit Profile next to your profile icon on top left.
- Scroll down until you find Photograph section.

- Click to mark at the radio button and browse to where your picture is located to be uploaded to Blogger profile.
- If you are finish uploading, scroll down to bottom of the page and click “Save Profile”.
- You are done.
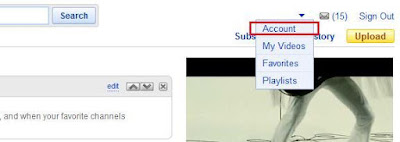
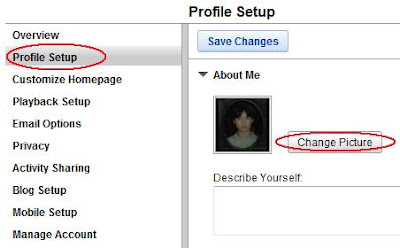
To add profile picture or photo to Youtube:
- Sign in to your Youtube account with your ID and password.
- Click “Account” from a drop down menu at the top right of the page.

- Click “Profile Setup” on the left of the screen.

- Click “Change Picture” button and browse to find your picture in the computer to be displayed as your thumbnail profile icon.
- Click “Save Changes” to save your update made to you Youtube channel.
- You’re done.
Subscribe to:
Posts (Atom)