


Creating our own email address at our own domain is very easy. Most paid website hosting servers have an opstion for creating your email address with your own domain name. This domain email is included with your cost and setting it up is not only free but it can also add a professional touch to your business. This is why many popular websites choose to have their own domain emails under their contact page. You can create a number of different email addresses on your web server but this number varies from one service provider to another.
Showing posts with label Email. Show all posts
Showing posts with label Email. Show all posts
Tuesday, November 3, 2009

Thursday, August 6, 2009
How to do payment transaction Paypal
Use Your Paypal Account To Purchase Goods Or Services, Paypal also enables you to send money using your PayPal balance, credit card, or bank account. Payments can be made in U.S. Dollars, Euros, and many other currencies:
What is PayPal & How to create PayPal
PayPal is one of the most popular online payment method. Using PayPal enables you to pay or get paid easily and quickly without sharing any of your financial information.
Saturday, August 1, 2009
How to Auto-Forward your email
If you like to do business in the internet or you are an internet marketer, sometimes you need to have multiple email accounts. To open or sign in to your each account everyday it might be tedious and troublesome. To solve this, you can auto-forward your email from one account to another account (excluding the spam)so that you only need to open one email address to see all the emails sent to you from all your accounts. Using filters, you can even forward only certain emails to certain addresses.
To make Gmail forward incoming messages to another email address automatically:

To make Gmail forward incoming messages to another email address automatically:
- Sign in to your Gmail account.
- Click “Setting” on top right of the page.
- Go to “Forwarding and POP/IMAP” tab.
- In the “Forwarding” column, click the radio button next to “Forward a copy of incoming mail to”.
- Enter the email address in the box that you want to forward the mail to.
- Gmail will keep every copy of your mail in its inbox (default setting), click the pull-down menu to change this behaviour to either trashes or archives the email after it has been forwarded. “Archive Gmail’s copy” option will make Gmail mark forwarded emails as read and remove them from inbox but keep the emails in the archive for later search and retrieval. The last option “Trash Gmail’s copy” will make Gmail move the forwarded messages to “Trash” after they have been forwarded. All the Trashed messages will be permanently deleted automatically after 30 days.
- Click “save changes” and you are done.

How To Create a Folder In Email
If you received many emails that are stored in your inbox, there are always messages that you delete after reading them and sometimes there are also messages that you want to keep so that you can read them again at a later date because the message was either funny, important or interesting.
If the mail messages you keep is getting too much, you might have difficulty finding out which email is from which and which email is from which. And sometimes if you want to find a particular message, you have to skim through all the emails from page to page in order to find it.
Fortunately, you can create folders in Yahoo mail so that you can organize all of your emails and group them according to their categories or specific groups. For example, folder A; to store emails from your friends, folder B; to store emails from your business partners and folder C; to store emails from your family or relatives.
Yahoo,
To create folder in Yahoo mail is very easy. First, log in to your email account, then on the left side of the page click "Add" (in the My Folder column), after that a pop-up box should appear and now you can fill in the box with the name of your new folder. When you are done, click OK and your new folder is ready to use. You can make up to 256 folders.
The second method to do it is to click "Edit" in My Folder column on the main page of your mail, then you will be taken to the Folders page. On the left side there is an Add Folder box, fill in the box with the name of your new folder and then click Add. Your new folder will appear in the right hand column. To rename the folder or delete them you can click "Rename" or “Delete” which are in parentheses next to the folder.
How to Delete Folder in Yahoo Mail
To delete unwanted folder you can first open that folder. Move the messages to other folders or you can delete them until the folder is empty. In the folder list, now right-click the folder that you want to delete and select ‘Remove’ from the menu and then click ‘OK’.
To delete folders in Yahoo Mail Classic, you can follow the ‘Edit’ link next to ‘My Folders’. After that click ‘Delete’ next to the unwanted folder and click ‘Ok’. The Inbox, Draft, Sent, Trash and Bulk folders cannot be deleted.
How to Create Folders in Gmail,
Actually Gmail does not use folders like Yahoo, Gmail uses labels instead. So if you have folders in your Yahoo mail, when using Gmail you will have labels.
Once we have created a label, we can view all the messages with that label by clicking the name of the label along the left side of any Gmail page or by searching.
We can add more than one label for an email, for example; emails which are labeled as "office" and "boss" are the emails that come from the office and sent by your boss, while emails which are not sent by your boss but still come from your office will only appear in the label "office".
How to create labels in Gmail
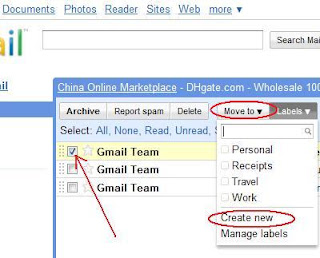
Choose any messages which you want it to apply to a label by filling the checkbox next to the messages, then click “Labels” a drop-down menu at the top and select “Create new”, after that type the name for your new label and click “Ok”. All the selected messages will be categorized under your new label.
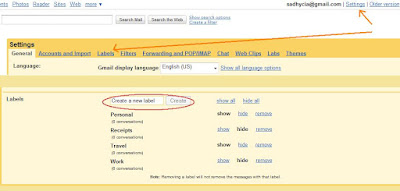
 Other way to do this is to click “Setting” on the top right of the page, then click “Labels” (see the picture below for easier reference). Fill in the name of your new label in the field provided and click “Create”, your new label will appear in the Labels list.
Go back to your inbox and select the emails you are going to add into your new label, after you’re done click “Labels” a drop-down menu at the top and select the name of your new label then the selected messages will be categorized under the chosen label.
How to rename or delete labels in Gmail
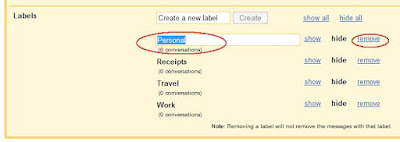
On the top right corner of the page, click “Settings”, then you will get a page with all the setting information, click the “Labels” tab and you will see all the available labels. After that click on the name of your label and blank column will automatically appear at the same spot, change the label name with a new name you want and press enter (done!).
If you want to delete some labels from the list, just click “Remove” link at the right side of each of those labels. When you delete the label, the emails assigned with the label will not get deleted.
If the mail messages you keep is getting too much, you might have difficulty finding out which email is from which and which email is from which. And sometimes if you want to find a particular message, you have to skim through all the emails from page to page in order to find it.
Fortunately, you can create folders in Yahoo mail so that you can organize all of your emails and group them according to their categories or specific groups. For example, folder A; to store emails from your friends, folder B; to store emails from your business partners and folder C; to store emails from your family or relatives.
Yahoo,
To create folder in Yahoo mail is very easy. First, log in to your email account, then on the left side of the page click "Add" (in the My Folder column), after that a pop-up box should appear and now you can fill in the box with the name of your new folder. When you are done, click OK and your new folder is ready to use. You can make up to 256 folders.
The second method to do it is to click "Edit" in My Folder column on the main page of your mail, then you will be taken to the Folders page. On the left side there is an Add Folder box, fill in the box with the name of your new folder and then click Add. Your new folder will appear in the right hand column. To rename the folder or delete them you can click "Rename" or “Delete” which are in parentheses next to the folder.
How to Delete Folder in Yahoo Mail
To delete unwanted folder you can first open that folder. Move the messages to other folders or you can delete them until the folder is empty. In the folder list, now right-click the folder that you want to delete and select ‘Remove’ from the menu and then click ‘OK’.
To delete folders in Yahoo Mail Classic, you can follow the ‘Edit’ link next to ‘My Folders’. After that click ‘Delete’ next to the unwanted folder and click ‘Ok’. The Inbox, Draft, Sent, Trash and Bulk folders cannot be deleted.
How to Create Folders in Gmail,
Actually Gmail does not use folders like Yahoo, Gmail uses labels instead. So if you have folders in your Yahoo mail, when using Gmail you will have labels.
Once we have created a label, we can view all the messages with that label by clicking the name of the label along the left side of any Gmail page or by searching.
We can add more than one label for an email, for example; emails which are labeled as "office" and "boss" are the emails that come from the office and sent by your boss, while emails which are not sent by your boss but still come from your office will only appear in the label "office".
How to create labels in Gmail
Choose any messages which you want it to apply to a label by filling the checkbox next to the messages, then click “Labels” a drop-down menu at the top and select “Create new”, after that type the name for your new label and click “Ok”. All the selected messages will be categorized under your new label.
 Other way to do this is to click “Setting” on the top right of the page, then click “Labels” (see the picture below for easier reference). Fill in the name of your new label in the field provided and click “Create”, your new label will appear in the Labels list.
 Go back to your inbox and select the emails you are going to add into your new label, after you’re done click “Labels” a drop-down menu at the top and select the name of your new label then the selected messages will be categorized under the chosen label.

How to rename or delete labels in Gmail
On the top right corner of the page, click “Settings”, then you will get a page with all the setting information, click the “Labels” tab and you will see all the available labels. After that click on the name of your label and blank column will automatically appear at the same spot, change the label name with a new name you want and press enter (done!).
If you want to delete some labels from the list, just click “Remove” link at the right side of each of those labels. When you delete the label, the emails assigned with the label will not get deleted.

How To Rename a Category In Email Address Book
Yahoo,
If you named a category in an address book wrongly you still be able to change or rename it. To rename a category in your Yahoo address book is very easy. First you sign in to your email account and then on the main page click "Contacts" tab at the top left.
After that you will be on Yahoo address book page and should see all your contacts in the list. Click "View All Contacts" and select the name of the category you would like to change. After the click, all the contact names under that category will appear, then you click "Change Name" link at the far right side, re-enter the name for your category in the box provided. After you finish renaming the category click "SAVE" and the changes you made will be saved in your Yahoo address book.
 How to delete a category in email address book:
Same way as described above, that is, after you are in the Yahoo address book page, click "View All Contacts" and select the category you would like to remove. After the click, all the contact names under that category will appear, then you click on rubbish bin icon at the far right side (easy enough right?).
Gmail,
Categories in Gmail are called ‘Groups’. So if Yahoo uses categories, Gmail uses groups. To rename the group of your contacts in Gmail is very easy, just follow these simple steps.
On the main page, click on "Contacts" which is on the left side of the screen. Located on the same column on the left, click on the Group name that you want to rename. After that you should see all the names under that group appear in the middle of the screen, click on 'More action', the drop down menu at the top right and select 'Rename group'. Overwrite the name in the field provided and click Save (you can see the pic below for easier reference).
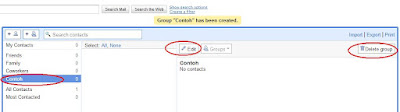
To delete a group, first you click 'Contacts' on the left side of the page, select the contact group from the groups list and then click Delete group at the top far right and click Ok. By doing this you are deleting the group but not the actual contacts themselves. Those will remain in your contacts list.
If you named a category in an address book wrongly you still be able to change or rename it. To rename a category in your Yahoo address book is very easy. First you sign in to your email account and then on the main page click "Contacts" tab at the top left.
After that you will be on Yahoo address book page and should see all your contacts in the list. Click "View All Contacts" and select the name of the category you would like to change. After the click, all the contact names under that category will appear, then you click "Change Name" link at the far right side, re-enter the name for your category in the box provided. After you finish renaming the category click "SAVE" and the changes you made will be saved in your Yahoo address book.
 How to delete a category in email address book:
Same way as described above, that is, after you are in the Yahoo address book page, click "View All Contacts" and select the category you would like to remove. After the click, all the contact names under that category will appear, then you click on rubbish bin icon at the far right side (easy enough right?).
Gmail,
Categories in Gmail are called ‘Groups’. So if Yahoo uses categories, Gmail uses groups. To rename the group of your contacts in Gmail is very easy, just follow these simple steps.
On the main page, click on "Contacts" which is on the left side of the screen. Located on the same column on the left, click on the Group name that you want to rename. After that you should see all the names under that group appear in the middle of the screen, click on 'More action', the drop down menu at the top right and select 'Rename group'. Overwrite the name in the field provided and click Save (you can see the pic below for easier reference).
To delete a group, first you click 'Contacts' on the left side of the page, select the contact group from the groups list and then click Delete group at the top far right and click Ok. By doing this you are deleting the group but not the actual contacts themselves. Those will remain in your contacts list.

How To Create a Category In Email Address Book
If we can make categories in blog, in email we also can make categories in our address book.
To create a category in your Yahoo email address book just follow these simple steps:
Yahoo,
Login to your email and on the first page click the "Contacts" tab on the top left. After that you'll be taken to the Yahoo address book page, on that page click "Add Category" and enter a name for your category and select the sort order. When finished click "SAVE", the category you just created will be stored in the address book and to edit them you can click "View All Contacts" a drop-down menu in the left and click on your category names that are listed there.
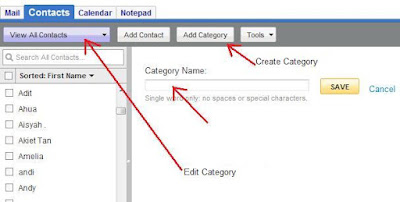 To add a contact to a category:
To add a contact from your address book to a category of course you must already have your mailing list or address book available in your email (click here to find out how to make an address book in your email). After you have created your address book you can view it by clicking the "Contacts" tab on the main page of your email.
Select the names by checking the box next to the contacts to group them into a category. When you are done, click "Add to Category" link at the right side. From the pull-down menu select which category (or create new category) you would like the selected contact(s) added to. After that, click "DONE" and all the selected contact(s) will be under that category.
 How to delete a contact from a category:
Once you are in the Yahoo address book category page, select and check the box next to the contact name that you want it to be removed, then click “delete” link at the right side (see pic above).
Gmail,
Categories in Gmail are called ‘Groups’. So if Yahoo uses categories, Gmail uses groups. How to create a group in Gmail is simple enough. Log in to your Gmail account, then click on Contacts on the left side of the page. Now click on the plus icon button or "New Group" at the top left and you will get a small pop-up window, type in the name of the group you'd like to create.
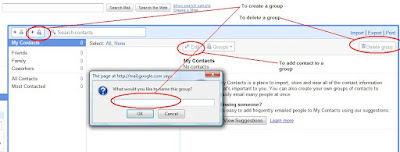 When you are done click Ok. The next time you are about to mail your group, type in the first few characters of the group name and you will be delighted to see it pop up, ready to use!
To add contacts to a group:
You need to add some email address (contact) in your Gmail group first. Log in to your Gmail account, click Contacts on the left side of the page, select contact(s) by checking the box next to the email address, after that click Groups menu at the right, and add to group you want.
To create a category in your Yahoo email address book just follow these simple steps:
Yahoo,
Login to your email and on the first page click the "Contacts" tab on the top left. After that you'll be taken to the Yahoo address book page, on that page click "Add Category" and enter a name for your category and select the sort order. When finished click "SAVE", the category you just created will be stored in the address book and to edit them you can click "View All Contacts" a drop-down menu in the left and click on your category names that are listed there.
 To add a contact to a category:
To add a contact from your address book to a category of course you must already have your mailing list or address book available in your email (click here to find out how to make an address book in your email). After you have created your address book you can view it by clicking the "Contacts" tab on the main page of your email.
Select the names by checking the box next to the contacts to group them into a category. When you are done, click "Add to Category" link at the right side. From the pull-down menu select which category (or create new category) you would like the selected contact(s) added to. After that, click "DONE" and all the selected contact(s) will be under that category.
 How to delete a contact from a category:
Once you are in the Yahoo address book category page, select and check the box next to the contact name that you want it to be removed, then click “delete” link at the right side (see pic above).
Gmail,
Categories in Gmail are called ‘Groups’. So if Yahoo uses categories, Gmail uses groups. How to create a group in Gmail is simple enough. Log in to your Gmail account, then click on Contacts on the left side of the page. Now click on the plus icon button or "New Group" at the top left and you will get a small pop-up window, type in the name of the group you'd like to create.
 When you are done click Ok. The next time you are about to mail your group, type in the first few characters of the group name and you will be delighted to see it pop up, ready to use!
To add contacts to a group:
You need to add some email address (contact) in your Gmail group first. Log in to your Gmail account, click Contacts on the left side of the page, select contact(s) by checking the box next to the email address, after that click Groups menu at the right, and add to group you want.
How To Create An Address Book In Email
An email address book, which is a collection of all your contact email addresses and other information is one of the most useful feature in email. The advantage of creating this email address book (or also known as mailing list) is that you can send message to many people without having to type the email addresses one by one in the destination fields provided. You can simply open the address book and check the boxes next to their names or next to the names of lists. When you are done selecting recipients, click the "Insert Checked Contacts" (Yahoo) or "Email" (Gmail) then all of your recipients’ email addresses should appear in the “To”, “Cc” or “Bcc” fields and the email you send will automatically go to all of those contacts (easy enough right?).
You can also group email addresses in your address book into various categories, for example; category of school friends; in this category contains all the email addresses of your school friends, category of coworkers; in this category contains all the email addresses of your colleagues or your coworkers, family category; contains email addresses of your family members or relatives (click here to find out how to create a category in the email).
Yahoo,
Open your Yahoo email, on the first page on top left side click Contacts tab, once clicked the Yahoo address book page will appear, then click Add Contact, after that you can fill in the email address and other information you need to put. You need not fill in all the fields, only the most important parts will be enough such as the name, nickname and email address. When you are done click Save and after that you will be able to send message to many people in an address book with so much easier (click here to learn more about how to send an email to several people at once).
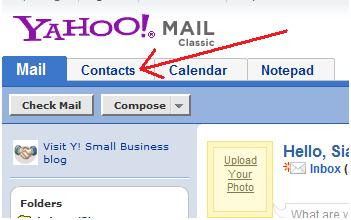
Gmail,
As for Gmail, click Contacts on the left of the page and then click add button (“New contact” button) at the top left corner. After that your contact data input form will appear, fill out the form (You do not need to fill in completely, just the important ones such as name and email address). When you are done click Save and now you can send one email to many people in an address book (click here to learn more about how to send an email to several people at once).

You can also group email addresses in your address book into various categories, for example; category of school friends; in this category contains all the email addresses of your school friends, category of coworkers; in this category contains all the email addresses of your colleagues or your coworkers, family category; contains email addresses of your family members or relatives (click here to find out how to create a category in the email).
Yahoo,
Open your Yahoo email, on the first page on top left side click Contacts tab, once clicked the Yahoo address book page will appear, then click Add Contact, after that you can fill in the email address and other information you need to put. You need not fill in all the fields, only the most important parts will be enough such as the name, nickname and email address. When you are done click Save and after that you will be able to send message to many people in an address book with so much easier (click here to learn more about how to send an email to several people at once).

Gmail,
As for Gmail, click Contacts on the left of the page and then click add button (“New contact” button) at the top left corner. After that your contact data input form will appear, fill out the form (You do not need to fill in completely, just the important ones such as name and email address). When you are done click Save and now you can send one email to many people in an address book (click here to learn more about how to send an email to several people at once).

How to send email to many people
How to send email to multiple contacts?
How if you want to send an email to many people in one go?, If it should be written and sent one by one it will be very tiring and time consuming especially when there are so many email addresses to be sent. There are 2 ways to overcome this problem;The first way is to send it manually, you can place or fill all the email addresses that you want to send into the “To”, “Cc” or “Bcc” field (click here to find out the difference between Cc and Bcc in email). You should remember to separate each email address with a comma and then type the following address (example; address1@gmail.com, address2@yahoo.com, address3@hotmail.com).
The second way is much easier and faster,
(Yahoo) that is to use or click "insert addresses" which is above the 'To' field in your mail message. After clicking on the text, a pop-up address book will appear containing all of your email contacts that you have to create it beforehand (click here to find out how to make the email address book). Check the boxes next to their names or next to the names of lists. When you are done selecting recipients, click the "Insert Checked Contacts" then all of your recipients’ email addresses should appear in the “To”, “Cc” or “Bcc” fields and the email you send will automatically go to all of those contacts as well.

(as for Gmail) Click Contacts on the left of the page, and then check the box next to the contact(s) you want to send (click here to find out how to create address book or list of contacts). After that in the third column, click Email and it will takes you to a compose mail page. All of your recipients’ email addresses should appear in the “To”, “Cc” or “Bcc” fields. When you finished composing your message, click on Send and your message will automatically go to all of those contacts.

How to Add Images to Yahoo Email
To add an image as an attachment in Yahoo mail probably most of you know how to do it, just click the ‘Attach Files’ button on the Compose Mail page, browse to where you put the image and it will automatically being uploaded. How about if including the picture directly in your message, so that readers will easily view the pictures and the message at the same place without having to bother downloading the images.
In order to do it, first you have to locate your images at any web server. You can upload it to free image hosting service like Picasa web album, Photobucket, ImageShack etc or to your own web host. After that you can insert the pictures from the web in an email, make sure the Yahoo mail rich text editor is enabled.

In order to do it, first you have to locate your images at any web server. You can upload it to free image hosting service like Picasa web album, Photobucket, ImageShack etc or to your own web host. After that you can insert the pictures from the web in an email, make sure the Yahoo mail rich text editor is enabled.
- Open your image in a browser, the one you upload to web server.
- Highlight the image using your mouse and press Ctrl + C (copy). If you right click the image and select "copy image" it doesn't work in Firefox, maybe it works for Internet Explorer. So better to highlight using your mouse and press Ctrl + C.
- Go to your Yahoo mail, put your cursor inside the email body where you want the picture to show up and then press Ctrl + V (paste). Yahoo has inserted the picture inside the email, you can continue typing your email after or before the image.
- You can also simply use ‘drag and drop’ to do this as an alternative way.

What do Cc and Bcc mean in a mail message
If you use email almost everyday, Im sure you would have seen fields of To, Cc and Bcc in your email though not everyone know what is the uses and differences between them. At first I did not know either, I usually use only the 'To' and 'Cc' to send messages, but since I use email everyday I got stuck in a situation where I need to know the uses and differences between each of them.
Well here I'll tell you a little use and the differences between those fields;
To: In this column you fill your main destination address.
Cc: Stands for carbon copy, in this field you can fill in addresses that you are going to send and copies of the message will be sent to every those addresses. Do not forget, if you need to insert more than one email address you need to separate them with a comma and then type the next address (example: addressone@gmail.com, addresstwo@yahoo.com, addressthree@hotmail.com). Addresses you entered in the Cc field will appear in every email you send, so each recipient can read and know who are the people you send the email to.
Bcc: Stands for blind carbon copy, in this field you can fill in addresses that you are going to send, almost the same as Cc, the difference is that when you fill in the addresses inside the Bcc field you do not need to fill anything to the To field or in other words the To field can be emptied. The addresses you fill inside the Bcc field will not appear in every email, the addresses are being 'hidden', each email recipient you sent may not know who are the people you send the email to. Do not forget, if an email address that you write is more than one then separate them with a comma and a space then type the next address (example: addressone@gmail.com, addresstwo@yahoo.com, addressthree@hotmail.com).
(Yahoo), If there are too many email addresses you want to fill in, you can use or click "Insert Address" link above and a pop-up address book will appear and with the click of a mouse you can send a group email to everyone in that address book. (Gmail), as for Gmail you can use or click "Contacts" on the left of the Gmail page and the list of all the contacts will appear and with the click of a mouse you can send a group email to everyone in that address book.
Not all emails will display Cc and Bcc fields automatically, some email like gmail you have to activate it by clicking the words "Add Cc" or "Add Bcc", if at yahoo click on "Show Bcc".
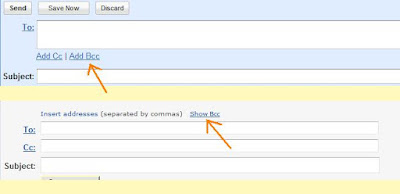
Well here I'll tell you a little use and the differences between those fields;
To: In this column you fill your main destination address.
Cc: Stands for carbon copy, in this field you can fill in addresses that you are going to send and copies of the message will be sent to every those addresses. Do not forget, if you need to insert more than one email address you need to separate them with a comma and then type the next address (example: addressone@gmail.com, addresstwo@yahoo.com, addressthree@hotmail.com). Addresses you entered in the Cc field will appear in every email you send, so each recipient can read and know who are the people you send the email to.
Bcc: Stands for blind carbon copy, in this field you can fill in addresses that you are going to send, almost the same as Cc, the difference is that when you fill in the addresses inside the Bcc field you do not need to fill anything to the To field or in other words the To field can be emptied. The addresses you fill inside the Bcc field will not appear in every email, the addresses are being 'hidden', each email recipient you sent may not know who are the people you send the email to. Do not forget, if an email address that you write is more than one then separate them with a comma and a space then type the next address (example: addressone@gmail.com, addresstwo@yahoo.com, addressthree@hotmail.com).
(Yahoo), If there are too many email addresses you want to fill in, you can use or click "Insert Address" link above and a pop-up address book will appear and with the click of a mouse you can send a group email to everyone in that address book. (Gmail), as for Gmail you can use or click "Contacts" on the left of the Gmail page and the list of all the contacts will appear and with the click of a mouse you can send a group email to everyone in that address book.
Not all emails will display Cc and Bcc fields automatically, some email like gmail you have to activate it by clicking the words "Add Cc" or "Add Bcc", if at yahoo click on "Show Bcc".

Sunday, July 5, 2009
How to add AddThis button and toolbar
What is AddThis?
Addthis is a service offer to help bloggers and publishers spread their content across the web. To do that, Addthis will give us ‘button’, the AddThis button which we add to our website or blog makes it easy for visitors to bookmark, share, subscribe to your feed and distribute our work to their favourite social service program. It also offer analytics feature which can track the readers and user from our Addthis button. They also provide utilities like Print, Translate and PDF Online. The Addthis button is an easy way to get followers and advertising for our website or blog without have to learn programming. The service is free, and neither does the analytics. The AddThis button can be used in two ways: add it on your blog or website and in the browser as a toolbar.
Addthis is a service offer to help bloggers and publishers spread their content across the web. To do that, Addthis will give us ‘button’, the AddThis button which we add to our website or blog makes it easy for visitors to bookmark, share, subscribe to your feed and distribute our work to their favourite social service program. It also offer analytics feature which can track the readers and user from our Addthis button. They also provide utilities like Print, Translate and PDF Online. The Addthis button is an easy way to get followers and advertising for our website or blog without have to learn programming. The service is free, and neither does the analytics. The AddThis button can be used in two ways: add it on your blog or website and in the browser as a toolbar.
- To get for yourself the Addthis button, go to www.addthis.com, make your selections and click “Get Your Button”. It’s easy, fast and free, next just copy the code given to you and paste it in the HTML section of your blog or website.
 If you want to get the analytics you have to register, enter your email and username or other info that is needed.
If you want to include the Addthis button below every post of your blogger blog, copy and paste the code into the Blogger template, right after the following tag:

- To install the AddThis toolbar, simply go to http://addthis.com/tools, select the type of the browser you are using and download.
 You can locate your AddThis toolbar near the top left on Firefox, and the same toolbar will normally located on the right side of your Internet Explorer browser.

Saturday, July 4, 2009
What is FeedBurner and how to use FeedBurner
Feedburner is basically an RSS feed management provider. It takes an RSS feed and converts it into a format which can be read, or translated by most of RSS reading services. FeedBurner is the most used RSS feed service and it is owned by Google which makes it more reliable. It helps Bloggers, podcasters and commercial publishers deliver and promote their content. FeedBurner also send out your videos, podcasts and images, basically whatever you post onto your sites or blogs, FeedBurner will send, even bookmarking links are included with your FeedBurner content. With FeedBurner you can get some interesting stats, make publishers easy to track their visitors and be able to know how many people read their material and where they come from. The service also optimizes the content distribution, making it easy to share, link and tag by users. If you change your domain and you only need to change the details on the FeedBurner website and your users are unaffected. They also offer an email service that will automatically inform all your subscriber when you have posted a new post. By using FeedBurner service to deliver your RSS content, you are also taking some loads away from your webserver. FeedBurner is very userfriendly, simple and easy to set up. You are also allowed to place Google advertising inside of your feeds.
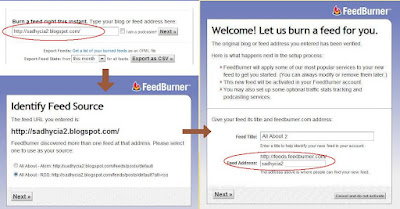
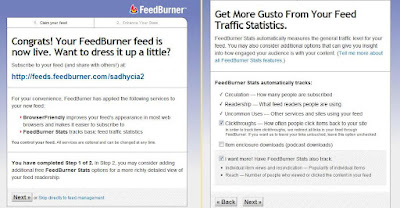
Your FeedBurner feed address for your website or blog would be feeds.feedburner.com/your chosen name. This address is for you to use it to promote your blog feed.

- To create FeedBurner account you have to go to www.feedburner.com
- Login using your Google account, enter your email and password in the box on the right side and click “Sign in”, if you don't have any Google account then click “Create an account” to create one.
- On the FeedBurner main page, fill in your blog address in the box and click “Next”.


Your FeedBurner feed address for your website or blog would be feeds.feedburner.com/your chosen name. This address is for you to use it to promote your blog feed.
- Once you setup your FeedBurner account, you will need to make sure all the feed traffic for your blog content goes to your FeedBurner feed, now you should set your blog’s default feed to FeedBurner. To do this, you login to your Blogger dashboard, click Setting > Site Feed and fill in your FeedBurner feed address into “Post Feed Redirect URL”.

- Dont forget to click “Save setting” when you’re done. After that Blogger will redirect all feed traffic for our blog to our FeedBurner feed.
How to use Google Reader
Google Reader is a tool which allow us to keep up with our favorite blogs and news. As a browser based application its easy to get going, you need not download any software. All you have to do to get Google Reader is to create a Google account and then sign in to Google Reader using your username and password to enjoy the features. To start using it, you can manually enter the URL of your favorite blogs into the “Add Subscription” area and Google Reader will find the feed and add it for you automatically. After entering the URL address of your favorite blogs into Google Reader, so any updated news or new article from the blogs will be sent to your Google Reader, and you can read it from there without having to open multiple tabs or windows to find the blogs or websites and check one by one. The other way to follow a blog is to click the “Subscribe To This Feed” button on the blog.
 Google reader has folders, the common used tool to organize a bunch of sites into groups. To use this tool you can click on “Manage subscriptions” in the bottom left-hand corner on the main page. After that it will take you to a new page where you can easily create and delete folders and feeds by clicking the menus on the right side of each feed, as well as categorize each feeds into folders. Once you have created folders, you can drag the chosen feed inside the folder by left clicking the feed and holding the button down while dragging it to the selected folder. This technique also can be used to rearrange your feeds or folders into the order you want them. The bold number beside the folder name is the number of new stories. You can view your stories in selected folder in expanded view (the full story display) or list view (consists of headlines and the first few words of each story) by clicking on the option in right hand side corner of the page. If you want to read the story from its original source, you can do it by clicking the headline or by hitting “V” on your keyboard.
If you want to find certain posts but you dont remember the name of the site or URL, you can search by keyword in Google Reader built in directory. Type in the keyword/s you wish to find and click “Search” at the top of the screen. Click on “All Items” drop down menu to find using different options, you can define the search to onnly display the starred stories, feeds you have shared, feeds your friends have shared or specific subscriptions or folders.

Like Gmail, Google Reader also let you star or tag your posts with labels for quick sorting by clicking the star icon on top left, beside the title of an article or click Add star option on the bottom left. You also can find out what your reading habits or your reading patterns are by clicking “Trends” in the menu bar on the left side. Google Reader Trends displays which of your feeds are most active. The Trends will describe your reading behaviour over the last 30 days.
You also can share and send stories of your favorite or stories which your friends might need it. To do that you can click on “Email” at the bottom of the story and a compose message box will appear underneath. You can insert 1,000 characters to add your two cents in the note to go along with the item. The second way to share your stories with other Google Reader accounts is to click the “Share” link at the bottom of the story. Clicking it will automatically publish the story to a publicly available blog, you can anytime uncheck the share button to unpublish it.
 Like Blogger, Google Reader also have export and import features where you can backup your feeds (export) and bring over your feeds from another reader (import). The two most common file types for export are the OPML and XML file. Google Reader accepts an OPML format, so makke sure to save your feeds in that format. To use this features you can click on “Settings” at the top right corner, then go to “Import/Export” tab, after that hit the browse button and go to where you store your OPML file from other reader to upload it into Google Reader.
 Google reader has folders, the common used tool to organize a bunch of sites into groups. To use this tool you can click on “Manage subscriptions” in the bottom left-hand corner on the main page. After that it will take you to a new page where you can easily create and delete folders and feeds by clicking the menus on the right side of each feed, as well as categorize each feeds into folders. Once you have created folders, you can drag the chosen feed inside the folder by left clicking the feed and holding the button down while dragging it to the selected folder. This technique also can be used to rearrange your feeds or folders into the order you want them. The bold number beside the folder name is the number of new stories. You can view your stories in selected folder in expanded view (the full story display) or list view (consists of headlines and the first few words of each story) by clicking on the option in right hand side corner of the page. If you want to read the story from its original source, you can do it by clicking the headline or by hitting “V” on your keyboard.
If you want to find certain posts but you dont remember the name of the site or URL, you can search by keyword in Google Reader built in directory. Type in the keyword/s you wish to find and click “Search” at the top of the screen. Click on “All Items” drop down menu to find using different options, you can define the search to onnly display the starred stories, feeds you have shared, feeds your friends have shared or specific subscriptions or folders.

Like Gmail, Google Reader also let you star or tag your posts with labels for quick sorting by clicking the star icon on top left, beside the title of an article or click Add star option on the bottom left. You also can find out what your reading habits or your reading patterns are by clicking “Trends” in the menu bar on the left side. Google Reader Trends displays which of your feeds are most active. The Trends will describe your reading behaviour over the last 30 days.
You also can share and send stories of your favorite or stories which your friends might need it. To do that you can click on “Email” at the bottom of the story and a compose message box will appear underneath. You can insert 1,000 characters to add your two cents in the note to go along with the item. The second way to share your stories with other Google Reader accounts is to click the “Share” link at the bottom of the story. Clicking it will automatically publish the story to a publicly available blog, you can anytime uncheck the share button to unpublish it.
 Like Blogger, Google Reader also have export and import features where you can backup your feeds (export) and bring over your feeds from another reader (import). The two most common file types for export are the OPML and XML file. Google Reader accepts an OPML format, so makke sure to save your feeds in that format. To use this features you can click on “Settings” at the top right corner, then go to “Import/Export” tab, after that hit the browse button and go to where you store your OPML file from other reader to upload it into Google Reader.
Friday, July 3, 2009
What is RSS Feeds
RSS (Really Simple Syndication) is a way to subscribe to a source of information, and the sources are called feeds. When you subscribe you will get a feed. It is a useful tool for keeping updated on your favourite blogs or websites. It delivers feed (often a series of headlines and brief summaries of articles published) from websites or blogs to people. The content will be delivered via a web portal, news reader (such as Google Reader, etc) or in email. Feeds also make it possible for your site content to be packaged into gadgets, widgets, mobile devices and other technologies that make it possible to display blogs, podcasts, news, weather or any other headlines just about anywhere. In a reality life, feeds are just like newspapers. A newspaper company sharing their news, stories, articles or whatever you want to call it, to all their customers by distributing newspaper. If you get your newspaper on your working desk or in the living room every morning, in internet you'll get your feed via email, news reader or web portal. So in internet world feeds are newspaper, you get your feeds by subscribing to your favorite websites.
Some web-browsing software will automatically detect RSS feeds. Opera and Firefox browsers display the square orange badge for a web feed in the address bar when they find RSS feeds on a site. In internet explorer, the symbol will appear in the toolbar and for Safari, you will get a blue rectangle with “RSS” written in white letters.
 Reading feeds requires something that can read and aggregate RSS files. Aggrregators collect and interpret RSS feeds in one location. Today there are more than 2,000 different news aggregators. RSS and a normal website have one thing in common, they both are simple text files on webserver. RSS uses www Consortium’s Resource Description Framework (RDF) as a guide to tell aggregators on how to read the file and RDF is based on extensible markup language (XML). RSS XML tags tell the aggregator how to display the feed on your screen. Many common blogging tools like Wordpress, Blogger, Movable Type and Vox have the ability to syndicate your weblog in RSS, so you dont need to know how to write code. These weblog programs has everything needed to publish a feed: the title, address, meta and other important information are all included for you. Of course, other organizations or websites who choose to publish with their propriety systems have to build RSS into their web code. You can do this too, if you know how to write a programming language.
Aggregators and RSS feeds are also sometimes called RSS Readers and RSS channels. FeedBurner is the most used RSS feed service at this time and it is owned by Google. Creating an RSS feed is very simple and easy, many websites now provide this feature to improve their SEO. The more subscribers you have, the more backlinks you will get and therefore the better SEO it will be for your sites.
Some web-browsing software will automatically detect RSS feeds. Opera and Firefox browsers display the square orange badge for a web feed in the address bar when they find RSS feeds on a site. In internet explorer, the symbol will appear in the toolbar and for Safari, you will get a blue rectangle with “RSS” written in white letters.
 Reading feeds requires something that can read and aggregate RSS files. Aggrregators collect and interpret RSS feeds in one location. Today there are more than 2,000 different news aggregators. RSS and a normal website have one thing in common, they both are simple text files on webserver. RSS uses www Consortium’s Resource Description Framework (RDF) as a guide to tell aggregators on how to read the file and RDF is based on extensible markup language (XML). RSS XML tags tell the aggregator how to display the feed on your screen. Many common blogging tools like Wordpress, Blogger, Movable Type and Vox have the ability to syndicate your weblog in RSS, so you dont need to know how to write code. These weblog programs has everything needed to publish a feed: the title, address, meta and other important information are all included for you. Of course, other organizations or websites who choose to publish with their propriety systems have to build RSS into their web code. You can do this too, if you know how to write a programming language.
Aggregators and RSS feeds are also sometimes called RSS Readers and RSS channels. FeedBurner is the most used RSS feed service at this time and it is owned by Google. Creating an RSS feed is very simple and easy, many websites now provide this feature to improve their SEO. The more subscribers you have, the more backlinks you will get and therefore the better SEO it will be for your sites.
Subscribe to:
Posts (Atom)