Thursday, September 24, 2009

Show profile image beside comments

In this post, i want to discuss on how to display profile image beside comments we post in our blog or people’s blog. Of course to do that we have to upload our profile picture to Blogger beforehand and that profile photo we uploaded will be used to display next to our comment. Here’s how:

  • After sign in to your Blogger, go to Settings and click on Comments tab.
  • Scroll down below and find “Show profile image on comments” and set it to “Yes”.
  • To disable profile image function in your blog’s comments, just simply set it again to “No”.

how to display profile image beside commentsThis feature is actually enabled automatically in all Blogger blogs, its only that if you have not upload your own picture or image, Blogger will display a default image which is the Blogger’s logo or icon next to your comments.

Add Blogger & Youtube profile photo

Here are two simple steps on how to add your photo to Blogger and Youtube profile.

To add profile picture or photo to Blogger:
  • Sign in to your Blogger with your ID and password.
  • Click Edit Profile next to your profile icon on top left.
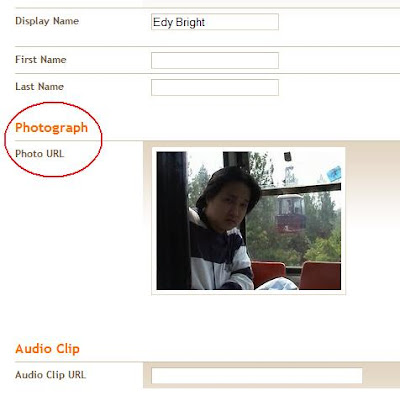
  • Scroll down until you find Photograph section.
how to add photo to Blogger profile
  • Click to mark at the radio button and browse to where your picture is located to be uploaded to Blogger profile.
  • If you are finish uploading, scroll down to bottom of the page and click “Save Profile”.
  • You are done.
Note: your Blogger profile picture will also be displayed automatically when you post a comment on a Blogger blog (depending on the blog’s settings). Click here to enable or disable that feature.

To add profile picture or photo to Youtube:
  • Sign in to your Youtube account with your ID and password.
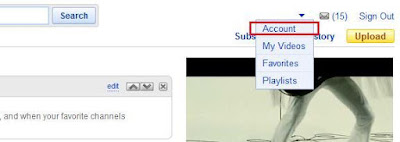
  • Click “Account” from a drop down menu at the top right of the page.
how to add profile picture to Youtube
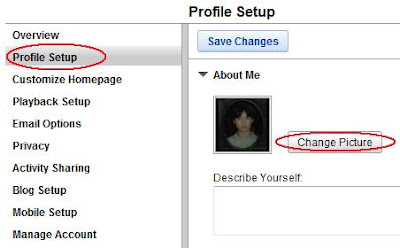
  • Click “Profile Setup” on the left of the screen.
how to add photo to Youtube
  • Click “Change Picture” button and browse to find your picture in the computer to be displayed as your thumbnail profile icon.
  • Click “Save Changes” to save your update made to you Youtube channel.
  • You’re done.

Create Tag Clouds or Label Clouds to Blogger blog

A tag clouds or some call it label clouds, is a visual depiction of list of items or a way to show your readers the topics your posts fall under. It is a list of links that will change in weight and size (sometimes colour too) depending upon some measurable attribute. Tag clouds is used typically to describe the content of websites and as a navigation menu. Tags can be arranged in any order but normally they are arranged alphabetically. You will often see tag clouds on blogs. Creating a tag clouds for your blog is as easy as A, B, C. Previously you need to use Javascript and extensive customizations to be able to display labels in cloud format, now Blogger supports this feature and you can show it on your sidebar without resorting to any third party hacks. Follow these easy steps to add tag cloud to enhance your keyword tags and the search engines will like it, therefore it might help your site rank for those keywords.
  • Login to your Blogger and click “Layout” from the dashboard.
  • On the “Page Elements” tab click “Add A Gadget” and a pop-up box will appear.
  • Scroll down the list from the box until you see “Labels” and click on it.

How to create a Blogger label cloud
  • Configure your Labels gadget, put the title you like, choose how should your label be shown, alphabetically or by frequency, display it in a list or cloud and etc.

difference between tag list and tag clouds
  • Click save when you’re done configuring the labels and the labels gadget will be added to your blog, drag it to the desired location.

The Difference Between Classic and Layout Template

The Difference Between Classic and Layout Template.


ClassicLayout
HTML

Old blogger version

To make substantive changes, you had to get more into the nuts and bolts of the CSS and HTML affecting your Blogger template.

Doesnt have “Layout” and “Page elements”, all of the customization options are found in what is called the “Template”.

Blogger needs to change the HTML code directly in the template in order to change the page elements.

On the dashboard, we will find option like this: Manage : Posts, Settings, Template

If we click on Template, there will be option like this: Edit HTML Pick New Customize Design Adsense.

There are no Previous Post, Home and Previous Post navigation links at the bottom of the posts.


XML

New blogger version

Allows you to make changes using a more push-button type approach.

More user-friendly especially for those with no HTML or programming background.

No need to republish, everything publish immediately.

On the dashboard, we will find option like this: Manage : Posts, Settings, Layout

If we click on Layout, there will be option like this: Page Elements Font and colours Edit HTML Pick New Template.

With this template we can easily move any element by using drag & drop.

Data separate from template code.

When loading a new layout, widgets data not transfered along with widgets code so that you have to enter widgets content separately.

Cannot be used on ftp blogs as it need to be hosted on Blogger server.


difference between classic and layoutFrom the example above, you would be able to identify what the current template you use.


How to revert to classic templateHow to migrate to layout template
Sign in to your Blogger.

Click Layout.

Click Edit HTML.

Click “Revert to Classic Template”.

If dialog box appear just click Ok.

Done.

Sign in to your Blogger.

Click Template.

Click Customize Design.

Click “UPGRADE YOUR TEMPLATE”

Select your desired template and click SAVE TEMPLATE.

Done.


Wednesday, September 23, 2009

How to use name tags (Facial Recognition)

Seems Google’s Picasa Web Albums has successfully made people amazed by their new technology. Picasa now has built-in face-matching technology (face-recognition feature) which could identify people’s faces by comparing facial features in photographs so we can easily add name tags to the people in our photos.

Picasa Web Albums now can scan our photos of what it believes are faces, allow us to identify a person we know in the photographs, and scan the rest of our pics for the same person allowing us to quickly tag them too and organize our photos. It automatically groups pictures containing similar faces so we can label a number of pictures at once.

Lets get started, here’s how to begin:
  • First sign in to Picasa Web Albums.
  • Click Settings in the upper-right corner.
  • Click Privacy and Permissions.
  • Check the first box labeled “Use name tags to name people in my photos” and then click Save changes (done).
After you’re done, Picasa Web Albums will automatically scan all of your photos for faces. Click “Add name tags” in the sidebar on the right side and Picasa Web Albums will start showing the groups of all the similar faces and ask you to name it one by one.

how to add name tags in Picasa Web AlbumsIf you found something not related you can always uncheck it, skip or mark selected faces as Ignore or Not a Face. You can link their tags to their email address if it is in your contact list. If you have tagged all of the photos, try to put your mouse cursor over any photo, their name will appear to show you who they are.

add name tags (face recognition)

Tuesday, September 22, 2009

How to use tags to label photos in Picasa Web Albums

Picasa Web Albums lets you tag your photos. By putting tags to label your photos in Picasa Web Albums, you can easily locate specific photos when searching. It is just the same as when you label your post in your blog or label your email in Gmail. You will find the option in the sidebar.
  • Sign in to your Picasa Web Albums using your Gmail username and password.
  • Select which photo you want to tag.
  • Click the tags button on the right side of the page.
  • Fill in the name of the tag inside the text box, enter a space separated list of tags, for example: “Wedding Flower” “Birthday Flower” Flower.
  • When you’re done simply click Add and done.

how to use tags to label photos in picasa web albumsYou can search your photos, your friends’ public photos and certain gallery. Google indexes tags, captions, album tiltles, album locations and album descriptions. To search for a photo with a tag, simply type the tag inside the search box provided in the upper-right corner of the page. Your search result will appear in the ‘My Photos’ section.

Monday, September 21, 2009

How to use Google's Picasa Web Album

Many Bloggers do not know that images they uploaded are automatically stored to Picasa. Google’s Picasa program allows us to put our photos online and easily sharing them over the web. Each account gets 1GB of free storage (enough to share or post around 4000 standard resolution photos).

How to use Picasa Web Albums


Learn how to use Google’s Picasa Web Album:
  1. Sign in using your ID after created a Gmail account.
  2. Upload your photos using the software’s “Web Album” button, you can also use your normal web browser to add images. You will be asked to make a new album for categorizing your images. If you choose to designate your photo album as unlisted, that means your online photo album can be viewed only for those who receive your invitations.
  3. You can start sharing your photos with anyone, select which album of yours that you want to share. Instead of attaching your photos one-by-one to send in an email, you actually can create and send a link to a photo, an album or even your entire online gallery and you can do it without leaving the Picasa Web Albums site.
  4. If your friend shares an album with you, you can download his/her album into your Picasa rather than simply viewing another’s photographs.
  5. You also can give your photo and your friend’s photo comments and add captions. If captions already given to your photos in Picasa, the same captions remain after you upload them to the web. Captions and comments added on Blogger or Picasa Web Albums will only be visible on that site.
To optimize your image is to tag and activate public display of images in picasa Web albums. Normally these images are held as unlisted and private. You can make them public by going to any album > Edit > album properties > Now choose public and save. You can label every images in the album section for better SEO.

Sunday, September 20, 2009

Howto make posted image unclickable

If you upload an image or picture to your blog especially Blogspot, the image uploaded will be clickable which means that visitors will be able to click the picture to enlarge it or find out the image url. Many people do not know that their picture can be hacked in order to be unclickable, this is a useful hack for people who want their image not to be clickable for certain reasons.

How to add alt tags to image

Everytime you upload an image via Blogger post editor, it is recommended that you use ALT tag (also known as alternate tag or image caption) and a title for better SEO techniques. Search engines look for your image by the text. Title tag is more important than an ALT tag as some browser do not recognise ALT tags (certain versions of firefox).

After uploading an image in Blogger posting section, a typical script we will get is shown below:

How to add alt tags to imageYou can try see it yourself by clicking Edit HTML tab next to Compose button, every image you upload you will be given a script of HTML codes. The letters highlighted in Blue ( see the pic above, to enlarge just click on it) are ALT tags and title tags. You are greatly encouraged to put some text between the quotation mark:

alt="How to add alt tags to image" title="How to add title tags to image"

These two tags helps the search engines to collect details of an image and categorize them accordingly.

There are some other factors that matter too:
  1. Name your image file using keywords
  2. Use keywords in the URL if the image is a link
  3. Add ALT tag to image
  4. Add Title tag to the image
  5. Do submit your image to social bookmarking sites like Mixx, Digg.
The purpose of this alt attribute is so that search engines will have an idea of what the image is about plus in the event that the image cannot be displayed, instead of a blank box, the text you added in the alt=”” attribute will be displayed. This also means we have more keyword density and more varied keyword density.

How to know if we successfully added an ALT tags and title tags?
When you move your mouse cursor over an image, if words pop up in a little box, then the title attribute has been utilized (example below).

How to add alt tags and title tagsFinal step to optimize your image is to tag and activate public display of images in Picasa Web albums. Many Bloggers do not know that images they uploaded are automatically stored to Picasa. Normally these images are held as unlisted and private. You can make them public by going to any album > Edit > album properties > Now choose public and save. You can label every images in the album section for better SEO. This lets people find your photos when searching on Picasa Web Albums or other Google services, including image search.

So remember to go through and set up your image ALT tags :)

Saturday, September 19, 2009

How to make read more in blogspot

Creating 'After the jump' summaries

Interested to show a select amount of your text from the beginning of each post instead of displaying the entire post on the front page of your blog?

Now Blogger has supported ‘Read more’ function.

Blogger has added new button called “Read More” button or “Jump Break” button which has function to cut off the article on homepage (also known as ‘Read more’ function). When your readers want to read the rest of your post, they can click a “read more” link to see the full or entire post. The good news is that now you can do it without the need for any HTML changes.

Thursday, September 17, 2009

How To Write Tags In Your Blog

When you do your blogging sometimes you need to put HTML tags in your posts. Simple ways of typing it manually and copy pasting will not work because browser will interpret your tags along with its mark ups of < and > as real tags, so therefore they will not be shown in monitors or just simply vanished.


For example, if you want to show to your readers on ‘How to make bold letters using HTML codes’ then you start demonstrating it by putting the HTML tags or codes in your posts (see below).

<b>Having fun with HTML codes</b>


After we have written down all the characters in our posts and published them, people will not see the same characters, but instead:

Having fun with HTML codes


The browser will consider the 'example' tag as a real tag. Therefore, your browser will apply it like any other HTML tags, insttead of showing it to your reader. What we need to do to solve this problem is that we have to make the tags not recognized as tags (by browsers). In order to do that, we need to write the tag mark ups of < and > with entities.

What is entities?, codes which draw certain characters in HTML programming is called entities.

The entity codes for < is &lt; and for > is &gt;

How to write tags on blog
So the proper way of showing it to your reader, you need to write it as (in our post, before publishing it):

&lt;b&gt;Having fun with HTML codes&lt;/b&gt;


Wednesday, September 16, 2009

How to Add Google Analytics to Blogger

Google analytics is a free useful service from Google that helps you to track the performance of your blogs and websites from one simple, easy-to-use interface. To get your Google’s analytics code you need to have a Gmail account to register for your Google Analytics account.


To Get Your Google Analytics Code:

After you have your own Google Analytics account, login at http://www.google.com/analytics/

  1. From the Analytics Settings page click on Add Website Profile, (select Add a Profile for another new domain).
  2. In the box, enter the URL of your blog or website that you want to track.
  3. Select your Country and Time zone, and then click Finish.
  4. Highlight the tracking code which displayed in the box and ‘Copy’.

how to get google analytics code

How to Add Google Analytics Code to Your Blogger Blog:

  1. Sign into your Blogger, the dashboard loads.
  2. Click on ‘Layout’ and then click ‘Edit HTML’.
  3. An editing screen for your blog template’s HTML displays, scroll to the bottom until the end of the template and paste your Google Analytics tracking code just before the closing ‘body’ tag. It will looked like this:

    (paste your Google Analytics tracking code HERE!)
    </body>
    </html>

  4. Dont forget to click Save Changes. (done!)
Tips: To remind yourself what tthe code you have added to your template is for, add a comment above it like thiss:
<!-- Google Analytics code -->

To Ensure You Have Successfully Added Google Analytics Code to Your Blog:

  1. Go back to your Google Analytics account.
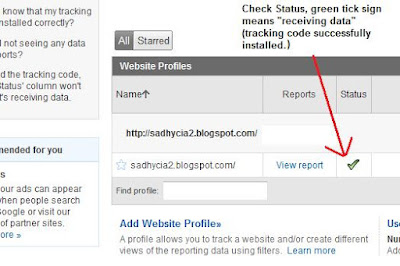
  2. At the main page, check your status which is under the Status column (next to your blog’s URL). If there is a green tick sign, it shows that it is “receiving data” (you were successful). If there is a yellow triangle and an exclamation mark, it means “Tracking not installed” (something is amiss).
  3. If it said “Tracking not installed” you can click on Check Status, Google then checks your blog for the Analytics Code and reports back if it find it or not.
  4. Once your Analytics tracking code has been verified, the green tick sign will appear and the status will change to ‘Receiving Data’. If not, try re-pasting the code.


How to add Google Analytics to Blog
Note: It takes about 24 hours or so after you install Gogle Analytics beforre you start seeing any data.

How to remove borders in header

The taste or usability of using header border depends on person. Some people do not like borders and thinking of removing it.
There is an easy way to get rid of the border around the header.

Here’s how to do it;

how to remove borders in header
On your dashboard select LAYOUT, and then ► EDIT HTML ► and find the following:

#header-wrapper {
width:750px;
margin:0 auto 10px;
border:1px solid #cccccc;
}
#header-inner {
background-position: center;
margin-left: auto;
margin-right: auto;
}
#header {
margin: 5px;
border: 1px solid #cccccc;
text-align: center;
color:#666666;
}

..just change the 1px into 0px in these two lines:

border:1px solid #cccccc; ► border:0px solid #cccccc;
border: 1px solid #cccccc; ► border: 0px solid #cccccc;

Tuesday, September 15, 2009

How to upload a header image

In order to make your blog looked unique, you should make your own header image.
I assume that you have a ready picture which you would like to place in your Blogger header. Edit you picture, touch up and resize using photo editing softwares. Save your picture in your computer or upload it onto an image server. Remember to make sure that the size of your image will align well with the rest of the header section. Turning on and off the Title and Description texts can also mess up your alignment.

You can browse to other blogs or websites and see which of your favorite header size and measure it. To measure the size of the header you can use free software such as Measureelt Addons if you use Firefox browser (download Firefox for free here). If Measureelt has been successfully installed, all you have to do is to draw out a ruler to get the pixel width and height of any elements on a webpage (it's very easy).

Ok, let's get started;
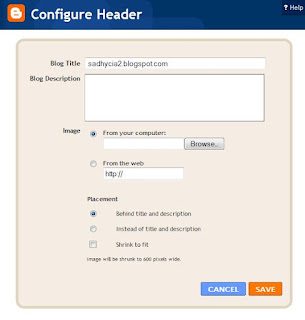
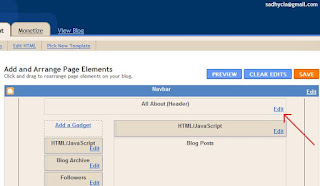
First sign in to your Blogger account, then click Layout and it will take you to Add and Arrange Page Elements. From there, click the Edit button for your header. The screen below will pop up.

Configure HeaderClick browse and go to where you put your image and it will be uploaded immediately from your computer. After being uploaded remember to fill in your Title and Description in the text box above, your picture will appear as a backgroundd to the Title and Description (turning the text off can be done later), after that save your changes.

To turn off or hide the blog Title and Description text simply click the header edit button again. Configure Header box will pop up again but with a slightly different option.

upload a header imageChoose the 'Placement: Instead of title and description'. This option will hide your Title and Description from appearing on the blog (but still kept as your blog's information). With this option, the image is clickable and will automatically link to your main blog index page. To show up your Title and Description text, simply click the other option.

If you select "Behind title and description", your picture will appear as a background, whatever you type as your title and description will bbe visible on the face of the image. With this option, only the title links to your main index page but the image does not.

Click here to find out how to remove borders in header.

You also can place your image in the header through HTML;
Go to Layout > Edit HTML and scroll down your template until you come across the "header wrapper". It looks like this;

#header-wrapper {
width:750px;
margin:0 auto;
background: url(URL OF YOUR PICTURE) bottom right no-repeat;
height: 200px;
}


Thursday, September 10, 2009

How to widen your blog in Blogger

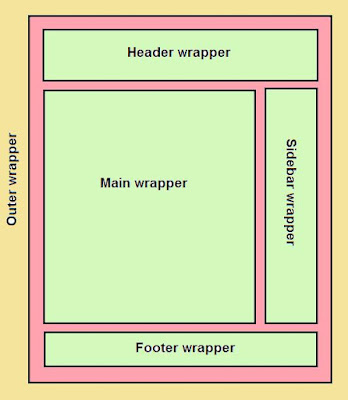
Normally if people change the width of the blog (outer wrapper), the width of the sidebar (sidebar wrapper) and the width of the posts column (main wrapper) also have to be changed because if the blog is set too wide then the distance between the sidebar and posts column will look very far.


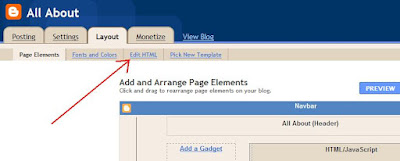
How do I widen my blog in Blogger? It's easy but you need to be careful. The first step is go to your dashboard and click on "Layout" after that click "Edit HTML" and your HTML column page will appear.

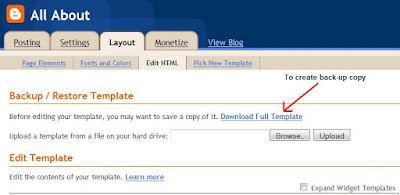
Edit HTML PageBefore proceed the next step, it is strongly suggested that you make a back-up copy of your template (to create a back-up copy you can click the "Download Full Template" link above the existing HTML column). If you do something which you do not like or know how to fix you can always upload your template and go back to how you originally were.

create back-up copy of blog templateWhen you are at Edit HTML page scroll down your template until you come across the outer wrapper. It looks like this;

#outer-wrapper {

To facilitate the search, you can press Ctrl + F on your keyboard, enter the code in the field provided and the browser will help you to find it. After that, change the width of your blog to the size you want. The red numbers as i illustrated below are the numbers that you have to change. The outer wrapper must have a higher number than the main wrapper and sidebar wrapper together. Outer wrapper is the layer that contains all the content of blog including header.

#outer-wrapper {
width: 950px;

Hit preview and if everything went well you will see the changes on your blog. If you want it more narrow or wider you can change the numbers. Dont forget to click "SAVE TEMPLATE" when you're done.

How to widen your blog

How to widen the posts column in Blogger

After you change the width of your posts column (main column), you might also want to change the width of your sidebar and the width of your blog as well. How do I widen the posts column in Blogger? It is easy enough but you need to be careful. The first step is sign in to your Blogger account. After login, you will reach your dashboard and click on "Layout" then click "Edit HTML" and your HTML column page will appear.

Edit HTML TabBefore proceed the next step, it is strongly suggested that you make a back-up copy of your template. (to create a back-up copy you can click the "Download Full Template" link above the existing HTML column). If you do something which you do not like or know how to fix you can always upload your template and go back to how you originally were.

Create copy of blog templateWhen you are at Edit HTML page scroll down your template until you come across the main wrapper. It looks like this;

#main-wrapper {

To facilitate the search, you can press Ctrl + F on your keyboard, enter the code in the field provided and the browser will help you to find it. After that, change the width of your posts column to the size you want. The red numbers as i illustrated below are the numbers that you have to change.
#main-wrapper {
width: 45%;

Hit preview and if everything went well you will see the changes on your blog. If you want it more narrow or wider you can change the numbers. Dont forget to click "SAVE TEMPLATE" when you're done.

how to widen the main column

Wednesday, September 9, 2009

How to widen the sidebar on Blogger

After you change the width of your sidebar, you might also want to change the width of your main column and the width of your blog as well. How do I widen the sidebar in Blogger? It is easy enough but you need to be careful. The first step is sign in to your Blogger account. After login, you will reach your dashboard and click on "Layout" then click "Edit HTML" and your HTML column page will appear.

Add and arrange page elementsBefore proceed the next step, it is strongly suggested that you make a back-up of your template. (to create a back-up you can click the "Download Full Template" link above the existing HTML column). If you do something which you do not like or know how to fix you can always upload your template and go back to how you originally were.

Create template copy of your blogWhen you are at Edit HTML page scroll down your template until you come across the sidebar wrapper. It looks like this;

#sidebar-wrapper {

To facilitate the search, you can press Ctrl + F on your keyboard, enter the code in the field and the browser will help you to find it. After that change the width of your sidebar to the size you want. The red numbers as i illustrated below are the numbers that you have to change.

#sidebar-wrapper {
width: 25%;

Hit preview and if everything went well you will see the changes on your blog. If you want it more narrow or wider you can change the numbers. Dont forget to click "SAVE TEMPLATE" when you're done.

how to widen the sidebar

How to make category in Blogger

If we can make categories on email, in blogs we also can. The first time you create a blogger account usually every post you make will be grouped into the archive in accordance with the month and year when you post. So if you want to search for any postings that you post on a particular month you can click on the month and all the posts in that month will be exposed. So what if you want to search for all posts on a particular topic, this certainly can be done on blogspot. How very easy;

1. Do post the article as usual at blogger.com by choosing "New Post".
2. After that watch the bottom of the article field, where you will find a small box that says "Labels for this post:", well .. that box allows you to categorize articles that are made by inserting a keyword in the box label like "Computer", and then click the "PUBLISH POST".

With the steps above you have successfully categorize articles that you post according to your keyword “computer”, and you can do the same again for another article. Every article you label as “computer” will be grouped under "computer" category.
After you create a category, then you can display the category list that you made in the following ways:

1. You try to go to the page "Layout".
2. After that click the link that says "Add a Gadget".
3. Then click the plus sign (+) on the gadgets that says "Labels".

With the above steps then the menu "Labels" will be active and will display all the category name or keywords you made, and if you click on any category the entire article under that category will appear.

Tuesday, September 8, 2009

How to set number of posts on the main page

When you first create a blogger account there are many posts that is displayed on the main page of your blog. Not a few of the bloggers turn it into a post that is displayed on the main page. You can also choose how many posts are you going to display in front of the main page of your blog. The way is quite simple and easy, first you go into your blogger account and click "settings" and then click the "formatting" the third tab at the top left, after that you can choose how many posts are you going to show on the main page of your blog at the first field of the page. Do not forget to click "SAVE SETTINGS" after you change it.

How to set number of posts on the main page:
Sign in Blogger account --> click setting --> click formatting --> select number of posts to display on main page --> click SAVE CHANGES and done!

Saturday, September 5, 2009

How to Change Fonts and Colors in Blogger

First login to your blogger account, on your dashboard area click “layout” link on your Manage Blogs column and you will get to a page called, Add and Arrange Page Elements. After you reach that page click on the “Font and Colors” tab on the upper left and finally you are at Font and Colors page. From this page you can change the page background color, text color, link color,blog description color, blog title color, visited link color, post title color, sidebar title color, border color, sidebar text color, sidebar title font, text font, sidebar title font, blog description font, blog title font and post footer font. What is good about the Fonts and Colors editor is that we can preview the changes immediately. Last step is dont forget to click “SAVE CHANGES” when you finish making your changes.

Blogger login --> click Layout --> click Font and Colors --> Save Changes (Done!).

How to Change Fonts and Colors