


 HubPages is a social networking and personal interaction website, you can promote your website through HubPages. It is just another way for webmasters to create their quality backlink. By using Hubpages, users can write anything they are knowledgeable about or anything they like and add links to direct relevant traffic to their main site. You can use Hubpages to promote your affiliate products or even your Internet home based business website, and another best part is that you do not have to learn or have any knowledge about HTML, PHP, CSS or any other tech stuff, it is basedd on WYSIWYG (What You See Is What You Get). The writing platform is sleek and user friendly. You also don't have to be an expert in order to write about a subject.
Showing posts with label Blog. Show all posts
Showing posts with label Blog. Show all posts
Sunday, April 11, 2010
What is and How to use Hubpages
HubPages is a social networking and personal interaction website, you can promote your website through HubPages. It is just another way for webmasters to create their quality backlink. By using Hubpages, users can write anything they are knowledgeable about or anything they like and add links to direct relevant traffic to their main site. You can use Hubpages to promote your affiliate products or even your Internet home based business website, and another best part is that you do not have to learn or have any knowledge about HTML, PHP, CSS or any other tech stuff, it is basedd on WYSIWYG (What You See Is What You Get). The writing platform is sleek and user friendly. You also don't have to be an expert in order to write about a subject.

Thursday, April 8, 2010
Mixx Social Media bookmarking website
 Mixx is another popular social media website among many others out there and the site helps you to submit any of your favorite or interesting content which you want to share it to other people. This social media site combines social networking and bookmarking. Mixx was launched in September 2007 and has a format similar to Propeller (Netscape) and Digg where you vote stories up or down. The difference is that once you submit stories to Mixx, you can’t delete it or change its title or description while you might be able to do this in other social media site. All of the content is user-generated, there are no editor who decides what you should find interesting, so you can submit stories, videos, photos —whatever you find informative, interesting, fun or different.
Thursday, April 1, 2010
Pinging service using Ping-o-matic
Pinging is one of the most effective, easiest and quickest things webmasters can do to promote their web pages. What is ping? A blog can simply use a pinging service to tell search engine “Im Over Here”, and the blog would get indexed almost immediately. One of the most popular site which offer this kind of service is Ping-o-matic. This "pinging" service is free to use and you dont even have to register to use the service. Though Ping-o-matic was designed to prromote blogs, but you can also use it to promote website.
Thursday, March 11, 2010
Tips to optimize AdSense for Search
AdSense for search can be a great way to increase website revenue for the owner. You can place 2 AdSense search boxes on a page. When visitors search some query using the search box on your pages and click on the ads which appear on the top and right side of the results page, you get paid. To implement Adsense for search you can simply copy and paste the code given into any place on your website and let the search engine collect the dollars for you :)
As many webmasters suggest that you should change the color of the search box to match the background of your site and text so that your AdSense search box should look like it belongs to the page, well..in fact a colorful and recognizable search box will stand out on your site and it works too, many bloggers have different result with both of them.
You also have the option given by AdSense whether you’d like the search results to be opened within your own website or to be host by Google. Many publisher choose to open within their own sites so that readers will believe that the source of search resullt is from your blog and this makes them love to click ads. The other reason is that the site owner have more control over the design. It’s not a bad idea also to put your search box on the results page itself for any users who might want to make another searches.
Publishers also can insert keywords to refine the results to make them more relevant to your readers. Let’s say you have a website about Photoshop, you can enter the keywords “Adobe”, “Computer Softwares” and “Photos”.
Your AdSense search box should be placed where your visitors can find it with a quick glance. Locations such as below the header and right or left navigation column are good spots for this. Place it above the fold, it means that the visitors should not have to scroll down in order to notice the search box. You can also place it below each post for easy navigation.
Another important thing should be considered is adding your logo, this is a cool feature because it provides chance for your readers to see and remember your logo that might increase their chances of remembering your website for a future visit.
As many webmasters suggest that you should change the color of the search box to match the background of your site and text so that your AdSense search box should look like it belongs to the page, well..in fact a colorful and recognizable search box will stand out on your site and it works too, many bloggers have different result with both of them.
You also have the option given by AdSense whether you’d like the search results to be opened within your own website or to be host by Google. Many publisher choose to open within their own sites so that readers will believe that the source of search resullt is from your blog and this makes them love to click ads. The other reason is that the site owner have more control over the design. It’s not a bad idea also to put your search box on the results page itself for any users who might want to make another searches.
Publishers also can insert keywords to refine the results to make them more relevant to your readers. Let’s say you have a website about Photoshop, you can enter the keywords “Adobe”, “Computer Softwares” and “Photos”.
Your AdSense search box should be placed where your visitors can find it with a quick glance. Locations such as below the header and right or left navigation column are good spots for this. Place it above the fold, it means that the visitors should not have to scroll down in order to notice the search box. You can also place it below each post for easy navigation.
Another important thing should be considered is adding your logo, this is a cool feature because it provides chance for your readers to see and remember your logo that might increase their chances of remembering your website for a future visit.
Sunday, November 1, 2009
Colspan and Rowspan in HTML Table
Part 1: HTML
Part 2: HTML Attributes
Part 3: HTML Table
Part 4: Colspan and Rowspan
Colspan and rowspan are html attributes used to span table cells across more than a column or row. Colspan is short for “column span” or indicates “how many across” while a rowspan indicates “how many down”.
Colspan is used within a <td> tag to specify how many columns it should span.
Here, i give you the example:
<table border="1">
<tr>
<td colspan="5">Cell 1-5 combined</td>
</tr>
<tr>
<td>Cell 1</td>
<td>Cell 2</td>
<td>Cell 3</td>
<td>Cell 4</td>
<td>Cell 5</td>
</tr>
</table>
and here is the outcome:
By setting colspan to "5", the cell in the first row spans five columns. Here below is another example for better understanding:
<table border="1">
<tr>
<td colspan="3">Cell 1-3</td>
<td>Cell A</td>
<td>Cell B</td>
</tr>
<tr>
<td>Cell 1</td>
<td>Cell 2</td>
<td>Cell 3</td>
<td>Cell 4</td>
<td>Cell 5</td>
</tr>
</table>
Here when you see in a browser:
Rowspan sets how many rows a cell spans.
Example:
<table border="1">
<tr>
<td rowspan="5">Cell 1-5</td>
<td>Cell 1</td>
</tr>
<tr>
<td>Cell 2</td>
</tr>
<tr>
<td>Cell 3</td>
</tr>
<tr>
<td>Cell 4</td>
</tr>
<tr>
<td>Cell 5</td>
</tr>
</table>
and here the result when you see in the browser:
Not as hard as you think right?, and with a number of practices, it should get easier and you might get used to it :)
Part 2: HTML Attributes
Part 3: HTML Table
Part 4: Colspan and Rowspan
Colspan and rowspan are html attributes used to span table cells across more than a column or row. Colspan is short for “column span” or indicates “how many across” while a rowspan indicates “how many down”.
Colspan is used within a <td> tag to specify how many columns it should span.
Here, i give you the example:
<table border="1">
<tr>
<td colspan="5">Cell 1-5 combined</td>
</tr>
<tr>
<td>Cell 1</td>
<td>Cell 2</td>
<td>Cell 3</td>
<td>Cell 4</td>
<td>Cell 5</td>
</tr>
</table>
and here is the outcome:
Cell 1-5 combined
| ||||
| Cell 1 | Cell 2 | Cell 3 | Cell 4 | Cell 5 |
By setting colspan to "5", the cell in the first row spans five columns. Here below is another example for better understanding:
<table border="1">
<tr>
<td colspan="3">Cell 1-3</td>
<td>Cell A</td>
<td>Cell B</td>
</tr>
<tr>
<td>Cell 1</td>
<td>Cell 2</td>
<td>Cell 3</td>
<td>Cell 4</td>
<td>Cell 5</td>
</tr>
</table>
Here when you see in a browser:
Cell 1-3
| Cell A | Cell B | ||
| Cell 1 | Cell 2 | Cell 3 | Cell 4 | Cell 5 |
Rowspan sets how many rows a cell spans.
Example:
<table border="1">
<tr>
<td rowspan="5">Cell 1-5</td>
<td>Cell 1</td>
</tr>
<tr>
<td>Cell 2</td>
</tr>
<tr>
<td>Cell 3</td>
</tr>
<tr>
<td>Cell 4</td>
</tr>
<tr>
<td>Cell 5</td>
</tr>
</table>
and here the result when you see in the browser:
| Cell 1-5 | Cell 1 |
| Cell 2 | |
| Cell 3 | |
| Cell 4 | |
| Cell 5 |
Not as hard as you think right?, and with a number of practices, it should get easier and you might get used to it :)
Using HTML codes to create Tables
Part 1: HTML
Part 2: HTML Attributes
Part 3: HTML Table
Part 4: Colspan and Rowspan
Tables are defined with <table> tag and it is made of rows (<tr>) and columns (<td>). Tr means table row and td means table data.
Part 2: HTML Attributes
Part 3: HTML Table
Part 4: Colspan and Rowspan
Tables are defined with <table> tag and it is made of rows (<tr>) and columns (<td>). Tr means table row and td means table data.
- To start creating table, you need an opening table tag, which is <table> and to end it, is to use table closing tag which is </table>.
- To start creating horizontal table rows you need the opening tag <tr> and after entering number of column/s you need to end it with a closing tag </tr>.
- To start making column in the table, as usual you need the opening tag <td> and after entering all the data, close it with a closing tag which is <td>.
What is attributes in HTML
Part 1: HTML
Part 2: HTML Attributes
Part 3: HTML Table
Part 4: Colspan and Rowspan
What is an attributes in HTML?
Attribute is an additional command towards the element which are written after a start tag and come in name/value pairs like: name=”value”. The values are always enclosed in quotes.
Here are the examples of attribute:
Part 2: HTML Attributes
Part 3: HTML Table
Part 4: Colspan and Rowspan
What is an attributes in HTML?
Attribute is an additional command towards the element which are written after a start tag and come in name/value pairs like: name=”value”. The values are always enclosed in quotes.
Here are the examples of attribute:
What is HTML and how to use it
Part 1: HTML
Part 2: HTML Attributes
Part 3: HTML Table
Part 4: Colspan and Rowspan
HTML stands for Hyper Text Markup Language, it is a language (computer language) to tell your browser how a page should be displayed, which makes it possible to present information, showing pictures, graphics and etc. The language consists of codes, and there are plenty different codes for all sorts of formatting. When you view a page from a browser, what you see is the browser’s interpretation of HTML.
You can see the HTML codes of a page on the internet by simply clicking “View” and then select “Source” or if you are using Firefox browser you can press Ctrl + U on your keyboard to view the codes. For people who do not know what is or how to use the codes, HTML code can be very complicated and scary to them. The good news is that HTML is very easy to learn and understand, if you want to build your own website you need to learn what is HTML and how to use it.
The HTML codes consists of tags (markup tags or usually called as HTML tags), and the tag itself consists of keyword inside angle brackets. Most HTML tags start with an opening tag and end with a closing tag. A HTML document has 2 parts: a head (information about the page, anything you put here will not be displayed on the page) and a body (information that constitutes the page, anything you put here will be displayed on the page).
Still get confused? Well, i think it’s better if we put it into practice. Practice can explain and make you understand much better rather than just theory.
Open a Notepad, copy and paste he following HTML codes:
<html>
<head>
<title>This is my first website</title>
</head>
<body>
<p><b>This is the first sentence</b></p>
<p><i>This is the second sentence</i></p>
<p><U>This is the third sentence</u></p>
</body>
</html>
Save your notepad and name it “mypage.htm”, don’t forget to choose “All Files” otherwise you save it as a text document and not HTML document.
 The ending “.htm” means that it is an HTML document, you also can name it with the ending of “.html”, it gives the same result. After that go and open the document by double-clicking the file. See and notice what happen to each of the sentence, different tag you apply to each of the line produce different effect to the text.
Here another common basic HTML commands:
<b> means "bold"
<i> means "italics"
<em> means "emphasis"
<u> means "underline"
<h1> means "heading 1"
<br> means "break"
<p> means "paragraph"
<hr> means "horizontal"
<ul> means "unordered list"
<ol> means "ordered list"
It doesn’t matter whether you type the tags in uppercase or lowercase, it will give the same result.
In the HTML code, there is attribute. Attribute also plays one of the most important role, but what is it? Let us discuss it in the next page.
Part 2: HTML Attributes
Part 3: HTML Table
Part 4: Colspan and Rowspan
HTML stands for Hyper Text Markup Language, it is a language (computer language) to tell your browser how a page should be displayed, which makes it possible to present information, showing pictures, graphics and etc. The language consists of codes, and there are plenty different codes for all sorts of formatting. When you view a page from a browser, what you see is the browser’s interpretation of HTML.
You can see the HTML codes of a page on the internet by simply clicking “View” and then select “Source” or if you are using Firefox browser you can press Ctrl + U on your keyboard to view the codes. For people who do not know what is or how to use the codes, HTML code can be very complicated and scary to them. The good news is that HTML is very easy to learn and understand, if you want to build your own website you need to learn what is HTML and how to use it.
The HTML codes consists of tags (markup tags or usually called as HTML tags), and the tag itself consists of keyword inside angle brackets. Most HTML tags start with an opening tag and end with a closing tag. A HTML document has 2 parts: a head (information about the page, anything you put here will not be displayed on the page) and a body (information that constitutes the page, anything you put here will be displayed on the page).
Still get confused? Well, i think it’s better if we put it into practice. Practice can explain and make you understand much better rather than just theory.
Open a Notepad, copy and paste he following HTML codes:
<html>
<head>
<title>This is my first website</title>
</head>
<body>
<p><b>This is the first sentence</b></p>
<p><i>This is the second sentence</i></p>
<p><U>This is the third sentence</u></p>
</body>
</html>
Save your notepad and name it “mypage.htm”, don’t forget to choose “All Files” otherwise you save it as a text document and not HTML document.
The ending “.htm” means that it is an HTML document, you also can name it with the ending of “.html”, it gives the same result. After that go and open the document by double-clicking the file. See and notice what happen to each of the sentence, different tag you apply to each of the line produce different effect to the text.Here another common basic HTML commands:
| <HTML> </HTML> | To create a Web page. All Web pages must have this command. |
| <HEAD> </HEAD> | All the head elements are written here, anything you put inside a head tag will not be displayed on the page. Elements inside head tag include scripts, meta information, instruct the browser where to find style sheets and more. |
| <TITLE> </TITLE> | Displays the Title in the title bar area. |
| <BODY> </BODY> | Anything you put inside the body tag will be displayed on the page and will be shown in the browsers to users. |
| <B> </B> or <strong> </strong> | The text will be shown in Bold |
<I> </I> or <em> </em> | The text will be shown in Italics |
| <u> </u> | To underline a text or words. |
| <strike> </strike> | |
| <CENTER> </CENTER> | |
| <H1> </H1> | Heading 1 |
| <H2> </H2> | Heading 2 |
| <H3> </H3> | Heading 3 |
| <H4> </H4> | Heading 4 |
| <H5> </H5> | Heading 5 |
| <H6> </H6> | Heading 6 |
| <BR> | New Line. Creates single space bettween lines. |
| <P> </p> | New paragraph. Creates double space between lines, paragraphs. |
| | To add a space. |
| <HR> | Produces a horizontal rule across document. |
| <ul> <li>A list</li> <li>Another list</li> </ul> |
|
| <ol> <li>First list</li> <li>Second list</li> </ol> |
|
<b> means "bold"
<i> means "italics"
<em> means "emphasis"
<u> means "underline"
<h1> means "heading 1"
<br> means "break"
<p> means "paragraph"
<hr> means "horizontal"
<ul> means "unordered list"
<ol> means "ordered list"
It doesn’t matter whether you type the tags in uppercase or lowercase, it will give the same result.
In the HTML code, there is attribute. Attribute also plays one of the most important role, but what is it? Let us discuss it in the next page.
Friday, October 30, 2009
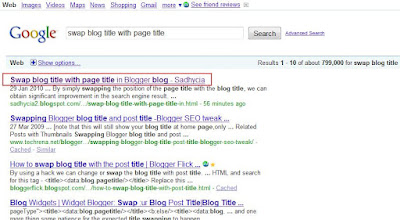
Swap blog title with page title in Blogger blog
By default, Blogger will place the title of your blog before the title of the article in the title bar. According to Search Engine Optimization, it is much better if our keywords in the title bar should comes first followed by the title of the blog. This to ensure that search engine robot or spider will read the keywords before anything else, so that our site is lkely to be placed higher in search engine result.
Fortunately, there is a good hack to rectify this problem. By simply swapping the position of the page title with the blog title, we can obtain significant improvement in the search engine result.

To swap the position of the blog title with the page title:
Fortunately, there is a good hack to rectify this problem. By simply swapping the position of the page title with the blog title, we can obtain significant improvement in the search engine result.


To swap the position of the blog title with the page title:
- Login to your blog and navigate to Layout – Edit HTML.
- Always backup your template before changing anything to avoid any undesired outcome. Click ‘download full template’ and save it into your harddisk.
- Replace this following line of code:
<title><data:blog.pageTitle/></title>
With this one:
<b:if cond='data:blog.pageType == "item"'>
<title><data:blog.pageName/> - <data:blog.title/></title>
<b:else/>
<title><data:blog.pageTitle/></title>
</b:if>
- After that click on ‘Save template’ and you’re done.
Add meta tags to each Blogger posts
Meta tag is an HTML tag which resides in the <head> section of a web page. Meta tags is not visible when seen in a browser, so visitors never see them. Meta tag is very valuable because of the fact that search engines are going to use it to describe our site in the search result. Meta tags are also used as an information for the search engine as whether your site is the one that users are looking for. Ignoring on-site search engine ranking factors can be costly because things like keyword-rich titles and solid internal linking can produce a very significant impact. Since Meta keywords and Meta description are not automatically generated for Blogger templates, we have to add them to the HTML markup of our Blogger templates.

How to add meta tags to each of your Blogger page:

How to add meta tags to each of your Blogger page:
- Login and open the dashboard of your Blogger blog
- Click Layout and Edit HTML
- Before making any changes to your template, always backup your current template.
- Find the following code:
<title><data:blog.pageTitle/></title> - Copy the following code snippet below, and after that paste it below the 'grey' code:
<b:if cond='data:blog.url == data:blog.homepageUrl'>
<meta content='DESCRIPTION' name='description'/>
<meta content='KEYWORDS' name='keywords'/>
</b:if> - So finally it will look like this:
<title><data:blog.pageTitle/></title>
<b:if cond='data:blog.url == data:blog.homepageUrl'>
<meta content='DESCRIPTION' name='description'/>
<meta content='KEYWORDS' name='keywords'/>
</b:if>
That will add the meta tags for your homepage of your blog. - Replace the DESCRIPTION with a description about your homepage (keep it less than 150 character).
- Replace the word KEYWORDS with your keywords, each keyword separated by commas and make it relevant for your homepage (keep word repetition less than 3 in order to avoid keyword spamming).
- To create and add another meta tags to each of your Blogger posts, copy this following code:
<b:if cond='data:blog.url == "URL-OF-YOUR-PAGE"'>
<meta content='DESCRIPTION' name='description'/>
<meta content='KEYWORDS' name='keywords'/>
</b:if>
place the code just below the - You can check whether you've add the meta tags correctly without any mistake with any meta tag analizer provided on the web like submit express or seo centro.
How to remove date, time and author on Blogger posts
There are many reason for blogger to hide their post date, post time and post author. It might appear less cluttered to them or simply they want to make their blog looks cleaner and tidier. Now Blogger provides an easy and fast way for you to hide those options without having to edit your HTML template and involve in HTML codes. You can choose to hide only post time, post date, or post author, or all of them, and even to hide some other options like label, comments, Show Quick Editing and etc . Ok lets we begin the tutorial:

You can also check the date of an article or web page and find out when it was first published.
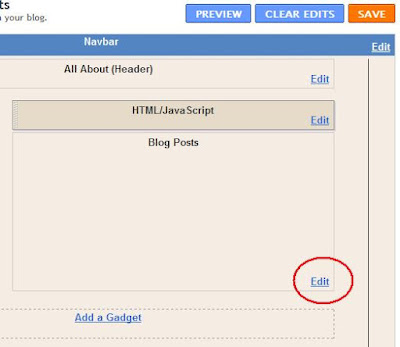
- First thing to do is of course sign to your blogger account and go to your Layout from your dashboard, then at the bottom of the Blog Posts box, click an edit button and a pop up box will appear.

- Now all you have to do is uncheck the radio button next to each Post Page options to hide the menu and check it again to re-show it on your blog.

- When you’re finished with your settings, click save and the task is done.
You can also check the date of an article or web page and find out when it was first published.
Remove Subscribe to: Posts (Atom) link
You will see there is “Subscribe to: Posts (Atom)” link in every new Blogger blog that enable visitors to subscribe to your Atom feeds. On the main page, this will link to your main site feed, whereas on post pages, this wiill link to the comments feed for a partricular post. However many bloggers choose to remove it because it occupies space at the bottom of the template so it does not look nice. Moreover, blog owners who try to make their blog looks more like a website will definitely choose to eliminate those links. To remove the “Subscribe to: Posts (Atom)” links:


- Sign in to Blogger and go to dashboard > Layout > Edit HTML > tick Expand Widgets Templates box.
- Save a copy of your current template, just in case if you do something wrong.
- Find and choose one of the following codes below and delete it:
<b:include data='feedLinks' name='feedLinksBody'/>
Or
<b:include name='feedLinks'/>
- To be sure this has worked, preview the blog template and save the settings, the “Subscribe to: Posts (Atom)” link wont be there anymore on your blog.
Remove Newer or Older Post Links
If you want to make your Blogger blog looks like a website, one of the things you need to remove is the “Newer Post”, "Home", and “Older Post” links from Blogspot post footer. Besides removing them you actually can change them or add images instead of “Newer Post” and “Older Post” links. There are two ways to do it and these hack are easy to perform and will take only few seconds.
 How do i get rid of "Older Posts" - "Home" - "Newer Post" links?
 How do i get rid of "Older Posts" - "Home" - "Newer Post" links?
- From your Blogger dashboard click on Layout > Edit HTML > tick Expand Full Templates box.
- Don’t forget to backup your template, many bloggers made mistakes in this hack.
- Search for the following code:
<data:newerPageTitle/>
and
<data:olderPageTitle/>
- Now simply delete above codes or replace with anything you want to write, to add picture just place the image URL before the Previous Page and Next Page. Remember to preview changes before saving it.
- Go to Layout > Edit HTML > tick Expand Full Templates box.
- Again, backup your template.
- Find these codes below:
#blog-pager-newer-link {
float: $startSide;
}
#blog-pager-older-link {
float: $endSide;
}
#blog-pager {
text-align: center;
}
- Add "display: none;" inside every curly braces, it will then looks like this:
#blog-pager-newer-link {
float: $startSide;
display: none;
}
#blog-pager-older-link {
float: $endSide;
display: none;
}
#blog-pager {
text-align: center;
display: none;
}
- Preview the changes and click save template.
How to change Blogger URL address
Simple steps on how to rename your Blog’s URL:
 Important:
There are many disadvantages of changing your blog URL especially if you have a well-established blog and has been on the Web for a long time. If you changed your blogger’s URL, any existing incoming links will become dead, therefore you will lose your loyal visitors who frequently visit your blog, except they are informed beforehand. These dead links include those bookmark links that you received from your social bookmarking websites and the links from Favorites and Bookmarks of your visitor's browser. Secondly, you can say bye- bye to your Alexa ranking and your Google pagerank which solely depends on your blog’s URL. You will have to wait for your new URL to be indexed by the search engines all over again.
So before changing your blog URL think it carefully, do it if it is absolutely necessary for you.
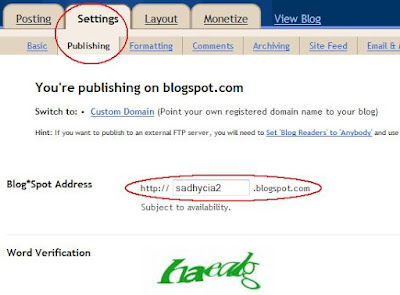
- Sign in to your blogger.
- On your dashboard, click on “Settings”
- On your Basic Settings page, switch to “Publishing” tab
- On Publishing Setings page, you have 2 options to change the URL of your blog. The first one is to enter a purchased domain name which will omit the “blogspot” in your URL. The second option is to type in the input box provided with your new URL ending still with “blogspot.com”. You will need to checkfor availability just as you did when you first created your URL. If the new address is available, your blog will be republished on the spot, under that address.
- Complete the word verification and save your settings.
 Important:
There are many disadvantages of changing your blog URL especially if you have a well-established blog and has been on the Web for a long time. If you changed your blogger’s URL, any existing incoming links will become dead, therefore you will lose your loyal visitors who frequently visit your blog, except they are informed beforehand. These dead links include those bookmark links that you received from your social bookmarking websites and the links from Favorites and Bookmarks of your visitor's browser. Secondly, you can say bye- bye to your Alexa ranking and your Google pagerank which solely depends on your blog’s URL. You will have to wait for your new URL to be indexed by the search engines all over again.
So before changing your blog URL think it carefully, do it if it is absolutely necessary for you.
How to add Favicon to Blogger blog
Favicon stands for “favourite icon”, (also known as a bookmark icon, shortcut icon or website icon). It is a 16 X 16 pixels icon which appears next to a website’s URL in the address bar, it also appears next to the page’s title in a tabbed document interface and in bookmarks. Adding a favicon to your own blog is a good way to distinguish your blog from millions of other blogs.
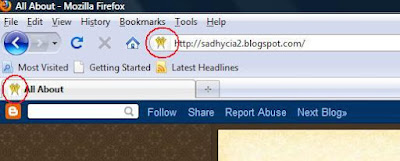
There are many free online tools which can help you generate a favicon. As for me, i use http://www.html-kit.com/favicon/ for my favicons. When you upload your favicon image to HTML kit’s they will automatically give you two 16 X 16 favicons to download, one is still image and the other one is animated version. You also can create your own image for your favicon from any image manipulation softwares like Gimp or Photoshop, just by selecting the dimension to be 16 X 16. I know there are still many sites that many people recommend to generate a favicon, but i dont have time yet to explore them.
To add favicon to your Blogger:

There are many free online tools which can help you generate a favicon. As for me, i use http://www.html-kit.com/favicon/ for my favicons. When you upload your favicon image to HTML kit’s they will automatically give you two 16 X 16 favicons to download, one is still image and the other one is animated version. You also can create your own image for your favicon from any image manipulation softwares like Gimp or Photoshop, just by selecting the dimension to be 16 X 16. I know there are still many sites that many people recommend to generate a favicon, but i dont have time yet to explore them.
To add favicon to your Blogger:
- You can upload your favicon image to an external web host, such as Photobucket or your Google Picasa album. Login to your Picasa photo album and Click upload button to upload your image. Once your image is sent, copy the URL by clicking “Link to this photo” on the right side of the screen. To copy your image URL, you also can do it by right-click on the image and select “Copy Image Location”.
- Login to your Blogger, from the dasboard click Layout and then Edit Html.
- Perform your back-up.
- Find the following code:
</head>
- Just above the code (or in between <head> and </head> tags), add the following HTML code:
<link rel="shortcut icon" href="Your-Favicon-Image-URL" >
or
<link href='Your-Favicon-Image-Url' rel='shortcut icon' type='image/vnd.microsoft.icon'/>
Replace the red text above with your favicon image URL. Once you're done, the code should finally appear like this (i take mine for an example):
<link href='https://blogger.googleusercontent.com/img/b/R29vZ2xl/AVvXsEhAK7V9Xnb759Kcso_g_BRPRljqrEBkIqzf3rBY2tGc5QxXihzecnkc4zOx77F9b4iHLb_hRyrBe4f51yuAXAroL7pIuq0NvoZBPQgzRho4L8kz_OO_fWTMXVS37g4J3t36FPRlkS5yvI9n/' rel='shortcut icon' type='image/vnd.microsoft.icon'/>
</head>
- Save your template and test.
Thursday, October 29, 2009
How to remove navigation bar in Blogger blog
You will see a navigation bar of every blogger blog, the colored stripe across the top that consists of Blogger search box used to search your posts, a link to your dashbord, a place to sign in, make a new post, and customize your blog option. Sometimes, the color of the Navbar does not fit for your Blogger design or template and Blogger does not provide any option for us to remove it. As many Blogger do not like to have it and choose to remove this bar in order to make their blog look more professional and does not look like the rest, and you need not try to match your blog’s colours to the limited colour palet which the Navbars come in. Secondly when your readers click on “Next Blog” on the navbar, they will be redirect to some other blog on the same window and your blog will disappear from the view.
 How to remove navigation bar from your Blogger blog (actually it is just hidden), it’s easy to implement. Here are the steps:
 How to remove navigation bar from your Blogger blog (actually it is just hidden), it’s easy to implement. Here are the steps:
- Sign to your Blogger, from the dashboard click Layout > Edit HTML.
- As usual, it is always recomended that you back up the template before changing anything. To perform the back up, just click “Download Full Template” and save it to your computer.
- Now look for the following code:
/* Variable definitions
- Immediately above that line, insert this following code:
#navbar-iframe {
display:none;
}
- Click “Save Template” orange button to save the changes.
- Done :)
Wednesday, October 14, 2009
How to Modify and Delete Borders in Blogger
For those using Blogger with Minima template, you can actually remove or change the borders from the header or sidebar. But if you just simply want to change the color of your borders, the easiest way is through Dashboard --> Design --> Template Designer --> Advanced.

From there you can choose the color you like, or make the color of the border the same as your blog background in order to ‘hide’ them. After that you can press “Apply to Blog”.
To alter other border such as header, you need to go to dashboard --> Design --> Edit HTML, then search for these lines:
/* Header
-----------------------------------------------
*/
#header-wrapper {
margin:0 2% 10px;
border:1px solid $bordercolor;
}
#header {
margin: 5px;
border: 1px solid $bordercolor;
text-align: center; color:$pagetitlecolor;
}
To change the size (height and witdh) of the border, you can insert the following line/s inside the curly brackets of the header-wrapper:
Just change the amount of pixel you want for your border.
If you want to remove the border around your image, you can just delete the whole line that i highlight in green (see below).
/* Header
-----------------------------------------------
*/
#header-wrapper {
height:140px;
width:780px;
margin:0 2% 10px;
border:1px solid $bordercolor;
}
#header {
margin: 5px;
border: 1px solid $bordercolor;
text-align: center;
color:$pagetitlecolor;
}
In the Minima template, the below codes create the border at the bottom of your every widget including the bottom of your main post:
.sidebar .widget, .main .widget {
border-bottom:5px dotted $bordercolor;
margin:0 0 1.5em; padding:0 0 1.5em;
}
If you want your border at the bottom of your sidebar to be different from the border at the bottom of your main post, you can split the above codes like this:
.sidebar .widget {
border-bottom: 3px dashed $bordercolor;
margin:0 0 1.5em; padding:0 0 1.5em;
}
.main .widget {
border-bottom:1px dotted $bordercolor;
margin:0 0 1.5em;
padding:0 0 1.5em;
}
you can change the style of your border to Dots, Solid, Groove, Double, Dashed etc.
If you change the -bottom above to -top, -left, -right, that setting will apply to border only in those areas.
You can actually steal other template's border and add it to your template so that you can have similar border style from the template you taken from.

From there you can choose the color you like, or make the color of the border the same as your blog background in order to ‘hide’ them. After that you can press “Apply to Blog”.
To alter other border such as header, you need to go to dashboard --> Design --> Edit HTML, then search for these lines:
/* Header
-----------------------------------------------
*/
#header-wrapper {
margin:0 2% 10px;
border:1px solid $bordercolor;
}
#header {
margin: 5px;
border: 1px solid $bordercolor;
text-align: center; color:$pagetitlecolor;
}
To change the size (height and witdh) of the border, you can insert the following line/s inside the curly brackets of the header-wrapper:
height:140px; (this is for the height)
width:780px; (this is for the width)
width:780px; (this is for the width)
Just change the amount of pixel you want for your border.
If you want to remove the border around your image, you can just delete the whole line that i highlight in green (see below).
/* Header
-----------------------------------------------
*/
#header-wrapper {
height:140px;
width:780px;
margin:0 2% 10px;
border:1px solid $bordercolor;
}
#header {
margin: 5px;
border: 1px solid $bordercolor;
text-align: center;
color:$pagetitlecolor;
}
In the Minima template, the below codes create the border at the bottom of your every widget including the bottom of your main post:
.sidebar .widget, .main .widget {
border-bottom:5px dotted $bordercolor;
margin:0 0 1.5em; padding:0 0 1.5em;
}
If you want your border at the bottom of your sidebar to be different from the border at the bottom of your main post, you can split the above codes like this:
.sidebar .widget {
border-bottom: 3px dashed $bordercolor;
margin:0 0 1.5em; padding:0 0 1.5em;
}
.main .widget {
border-bottom:1px dotted $bordercolor;
margin:0 0 1.5em;
padding:0 0 1.5em;
}
you can change the style of your border to Dots, Solid, Groove, Double, Dashed etc.
If you change the -bottom above to -top, -left, -right, that setting will apply to border only in those areas.
You can actually steal other template's border and add it to your template so that you can have similar border style from the template you taken from.
How to modify or change image border in Blogger
In previous post you probably have read my post about how to remove image border from your Blogger posts, in addition here i want to show you how to modify, change, add styles or effects to the border of your images as well.
There are number of methods to change the color of the image border in Blogger. Here is one of them:
To change the border line style around your image from solid line to dotted line you can simply change the word like this:
To change the border line style around your image from solid line to dashed line you can simply change the word like this:

The word control the type of your image border, and other types of line style that you can use as a border are "groove", "inset", "outset", "double", "ridge" and "hidden". Try replace with those words and see how it looks like.
What is padding? Padding is a space between your border and your image. To increase or decrease the space between your border and image you can change the pixel number from this following line:
To add a background to your image as border:
To add a background effect you must have your padding on, after you add your padding then you can add this following line to your code:
Replace the Image Location text to your image URL. Your code should then look like this:
.post img {
border: 6px solid #FF0080;
padding: 12px;
background: url(Http://www.pichost.com/myimage.gif);
}

There are number of methods to change the color of the image border in Blogger. Here is one of them:
- From your Blogger dashboard, go to Layout – Edit HTML (no need to check the Expand Widgets Template box).
- Find the following code, you can use Ctrl + F to find them via your browser finder:
.post img {
padding:4px;
border:1px solid $bordercolor;
}
or
img{
padding: 4px;
border:1px solid $bordercolor;
}
- The code above is the tag for your images style. After you found it, change the following line:border:1px solid $bordercolor;toborder:1px solid #FF00FF;
- Replace the red color text above with your own color HTML code. For example if you want it to be dark red: border:1px solid #B40404; or if you want it to be light green: border:1px solid #A9F5A9.
- After you’re done click Save Template button to save your changes.
To change the border line style around your image from solid line to dotted line you can simply change the word like this:
border:1px dotted $bordercolor;
To change the border line style around your image from solid line to dashed line you can simply change the word like this:
border:1px dashed $bordercolor;
Dashed style.
The word control the type of your image border, and other types of line style that you can use as a border are "groove", "inset", "outset", "double", "ridge" and "hidden". Try replace with those words and see how it looks like.
 border 8px Double, padding 2px | |
 border 8px Inset |  border 8px Outset border 8px Outset |
 border 8px Ridge, padding 2px |  border 8px Dotted |

What is padding? Padding is a space between your border and your image. To increase or decrease the space between your border and image you can change the pixel number from this following line:
padding: 5px;
To add a background to your image as border:
To add a background effect you must have your padding on, after you add your padding then you can add this following line to your code:
background: url(Image Location);
Replace the Image Location text to your image URL. Your code should then look like this:
.post img {
border: 6px solid #FF0080;
padding: 12px;
background: url(Http://www.pichost.com/myimage.gif);
}

Tuesday, October 13, 2009
How to remove image border in Blogger
In certain Blogger templates such as Minima template, there is an image border given automatically everytime you upload your photos or images to your blog. Sometimes you need to remove it or change it all the image borders around all your images that appear in your posts.
Here are the example of image with border and without border:
How to remove image border in Blogger, here are the steps:
To increase the width of your image border, just simply change the pixel number from 1px to 2px or 3px etc.
How to remove the border of an image of a single post and leaving the rest alone with their borders?
In this case then you can edit your post which contains the image that you want to remove its border, go to "Edit Html" mode and insert this following code inside the image source tag of the image:
so the code should then appear like this:
Here are the example of image with border and without border:
 | |
How to remove image border in Blogger, here are the steps:
- Log in to your Blogger account.
- On the dashboard, navigate to Layout – Edit HTML.
- Download your existing Blogger template for your back up by clicking “Download Full Template” button.
- Find the below code in your template (no need to tick the Expand Widgets Templates box). Note: the code in Blogger blog templates varies but the code below is the code we will find on a Blogger Minima template or most other default Blogger templates.
.post img {
padding:4px;
border:1px solid $bordercolor;
}
or if you could not find those code, find these code below:
img{
padding: 4px;
border:1px solid $bordercolor;
}
- When you have found it, you have two ways to delete or remove the unwanted border image code. You can either delete the following line:border:1px solid $bordercolor;
or change the border pixel to zero, like this:border:0px
- After that dont forget to click "Save Template" button and start to admire your new post images without the image border.
To increase the width of your image border, just simply change the pixel number from 1px to 2px or 3px etc.
How to remove the border of an image of a single post and leaving the rest alone with their borders?
In this case then you can edit your post which contains the image that you want to remove its border, go to "Edit Html" mode and insert this following code inside the image source tag of the image:
style="border:none;"
so the code should then appear like this:
<img src="image location" style="border:none;" />
Monday, October 12, 2009
How to back up your Blogger blog
Perhaps one of the most important thing about Blogger is to know how to back up your entire blog especially when you have put so many effort and had so many posts in it. There can be nothing worse than to find your blogger blog gone one day, either being hacked, corrupted, deleted or any other unforseen error. In the past backing up our posts, comments, pictures or images and links was almost impossible and requires some kind of third party software. Blogger changed a lot and always come up with new features, this time i want to write about their ‘backup’ function. Now we can create a complete backup of our Blogger blog on to the hard drive easily and fast, just in a clicks. At least now you dont have to worry if you accidentally delete some of your old blog post.


This export import features can also be used to export all of your Blogger blog to other blogging platform like Live Journal, Wordpress, etc.., or to import your blogs from Wordpress, etc.., into your Blogger blog.
- To start backing up your Blogger blog, first sign in to your account.
- From your dashboard click setting.
- On the basic tab click Export blog.

- A new page will load, click “Download Blog” and the download manager will appear, save your XML file to your hard disc.

- Done.

This export import features can also be used to export all of your Blogger blog to other blogging platform like Live Journal, Wordpress, etc.., or to import your blogs from Wordpress, etc.., into your Blogger blog.
Subscribe to:
Posts (Atom)